Miter Keys...
Photos and Description

By David Knipfer
January 2005


OK... once the box carcass is glued-up I always like to
  • reinforce the miter joints with keys.

  • I cut the miter key slots using my
  • tablesaw and a
  • shop made sled.

  • A few things to note here...

    First, I am always amazed at the
  • holding power of the
  • Type I PVA that
  • I use to glue-up the carcasses.

  • I have evolved to the point that I am now
  • comfortable machining the key slots
  • as soon as the clamps come off the carcass...
  • 1 hour for me.

  • Also note that
  • I leave the 'miter folding' tape in place for this operation...
  • that little bit of tape helps prevent fuzzy edge tearout while cutting the key slots.

  • Lastly... it is important to
  • pay attention to the tooth profile of the blade you use for this task...
  • you want to use a flat tooth profile to achieve a flat bottom groove.

  • Using a typical ATB crosscut or combination blade will leave you with the edges of the slots scored... DAMHIKT.
  • Here is how the slots should look after machining...
  • clean and flat.
  • Now you need to come up with some stock to use as the miter keys themselves.

    There are two distinct aesthethics you can choose here...

    You can choose key stock that
  • matches the carcass timber... thus
  • 'hiding' the keys.

  • That does NOT usually work so well for me... it normally ends up
  • looking like a mistake that I tried to hide.

  • Sooooo... your other option is to be bold about the deal...
  • pick some key stock that grabs the eye.

  • That is what I normally do...
  • pick a contrasting key stock and
  • even if it looks stupid at least
  • it's obvious that it was intentional.

  • Here is some key stock that I used on this curly cherry carcass...
    I make my key stock from
  • laminated timbers.

  • This curly cherry carcass will have some
  • quilted maple drawers and
  • purpleheart pulls... so that
  • key stock is maple laminated over purpleheart.

  • Chop the key stock to length...
  • I use my bandsaw.
  • This is not dimensionaly critical task...
  • just be sure it is long enough...
  • all the excess gets trimmed off later.

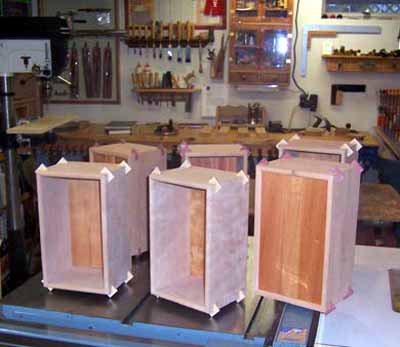
  • Apply a liberal amount of glue to the keys and
  • shove them into the slots...

  • Thats it... I now have a flock of little box carcasses.

    A final note...
  • now is NOT the time to get in a big hurry to trim the keys flush.

  • The moisture in the PVA
  • needs to dissapate... otherwise, you
  • will end up with shallow depressions when the keys finally shrink back to dry state.

  • I'll set this flock of carcasses aside
  • for 4 or 5 days... then
  • flush those keys with a block plane.

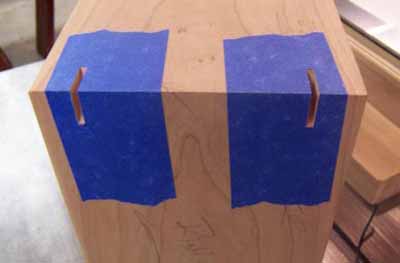
  • I do not use biscuits in any way here... I glue the miters up with Type I PVA... then these miter keys are the reinforcement.


  • The Key thickness is the only dimension on the keys themselves that matters.

  • They need to fit the slot just right...
  • I make mine so that they are 0.003" thinner than the saw kerf.

  • Much thinner than that and
  • you'll end up with a gap... and
  • any thicker and you can't fit them when they swell from that shot of glue.

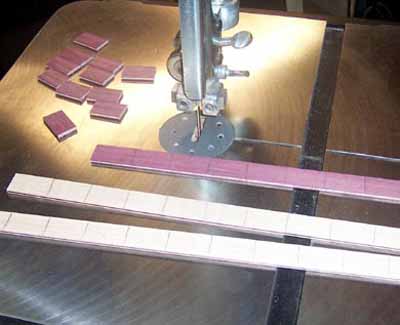
  • I do the thickness dimensioning on my
  • Performax drum sander...
  • it's one of the few tasks that machine is well suited for.

  • BTW... anybody who says that measuring WW parts to the thousandths is a waste of time has not, IMHO, spent much time in the pursuit of gap-free joinery.

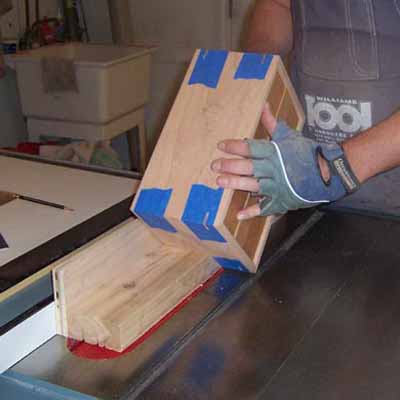
    I use my CMT rip blade...
  • you'll find that most (not all) true rip blades have a flat ground tooth profile.
  • Be sure it's sharp and clean and you'll get perfectly clean, flat bottom grooves every time.


  • Thats all.

    Enjoy

    Knipfer


    This site is maintained by:
    Good-Lyddon Data Systems

    Copyright © 2004-2010 Joe Lyddon, WoodWorkStuff.net