|
|
Question:
How does Dave Knipfer make the flush drawer pulls that end up behind doors?
Answer: (by Dave Knipfer)
WARNING... 'stealing' is when you reproduce someone elses work for profit
and call it your own...
Being inspired by an idea is when you takes someone elses work and use the
concept to create your own thing.
I know for sure that whatever you are building there is Your work... and thus
looking for some insight about how I made those pulls is completely fair game...
not stealing at all.
That said... "Starburst" is still to this day my favorite box... despite all the
pretty ones I have turned out she is still owning that special place in my
spirit...
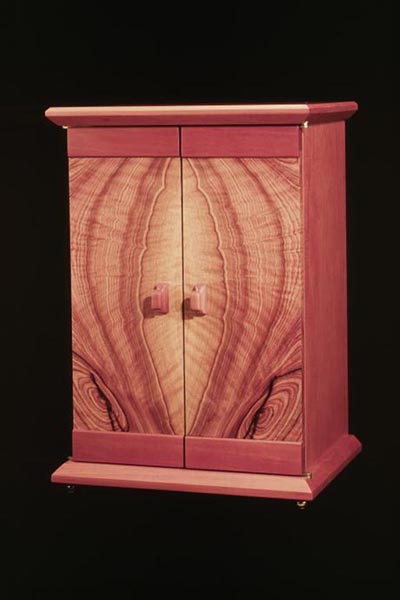
That is the photo that I wish FWW chose to publish.
Now... to your question ....
If you want your doors to close flush against the drawers... as they do in
"Starburst", then...
The design requirement here is to build your drawers and pulls such that
nothing extends beyond the outer surface of the drawer fronts.
This immediately leads you into needing to create some sort of recess into
the drawer fronts... the recess is needed to allow you to fit a pull flush
with the drawer fronts and still have room to get your fingers comfortably
behind it.
Sooooo... here is the photo that FWW did publish... and I'll use this photo
to describe my method...
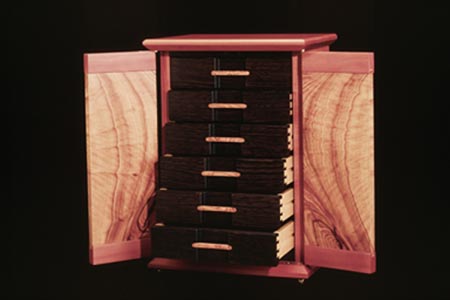
First you need to create a recess into the drawer fronts.
"Starburst" has a recess that is the same width across the drawers... so I
created this one on my router table.
You can use any bit you wish to build that recess... but I've learned that
it's very difficult to hand sand a radius in the bottom corner of the
recess... soooo...
I choose router tooling that has a radius to the profile.
For straight recess like this one I'll use a 'bowl and tray' bit...
Just chuck that bit up in your router table and make multiple small passes
until you get deep enough... say 1/2 of the drawer front thickness.
Then hand sand the recess and file/sand a radius on the outer edge.
For another option... I had a recent post that showed my method for creating
a curved recess... this involves templates and a round profile bit to clear
the waste.
Whatever way you go about it... first you need a recess in the drawer fronts
deep enough to accomidate your pull with space behind for a finger.
Once that recess is in place and smoothed out... then the actual pulls
themselves are simple... with a little paitence.
The pulls for "Starburst" are strips of Olive (left over from the door
panels) that are fit into routed mortises that span the recess.
Sooo... mark up your drawer fronts and rout a shallow mortise across the
recess...
"Shallow" meaning here that you want the back of the pull to have enough
clearance from the bottom of the recess that you can still get a finger
behind it... but also deep enough that the pull is not too thin.
Use your discretion at this point.
Once that is done... recessed drawer fronts with mortises routed across
the recesses...
Then you just build some pulls that span the width of the mortises
exactly.
This part is kind of trial and error... you can easily plane some stock
to the width of that mortise... and you can also easily plane it to the
depth of that mortise... but...
Hand sanding a radiused end into both sides of that pull. a radius that
matches exactly the curved mortise ends while also being the exact right
length... this part takes some dedication... and it is a good personal
test of how willing you are to throw away 'good' parts that are not
perfect.
I made 11 pulls to get to the 6 that fit my "Starburst:".
Now... when you have enough pulls that fit the mortises to your
satisfaction... just glue them in and scrape them flush with the drawer
fronts once they have cured.
If you do all that... you will end up with flush drawer fronts with pulls
that fit very elegantly behind a set of doors.
I hope you show us a photo of whatever you come up with.
Knipfer
 
This site is maintained by:
Good-Lyddon Data Systems
Copyright © 2004-2010 Joe Lyddon, WoodWorkStuff.net
|
|