Bird's Mouth Joint
for an Octagonal Column

by Edwin C. Hackleman


The bird's mouth joint seems to terrify woodworkers so much that they end up making simple miters, a far inferior way to form a column.

To make an octagonal column,
  • eight boards of equal width are required.
  • The bird's mouth is cut on one edge of each board using two passes on the table saw with the blade angled at 45 degrees.
  • The other edge is left square... see the pictures. (octagonal walls and cutting a bird's mouth joint).


  • I position the fence a little less than the width of the board away from the blade rather than try to work with the blade really close to the fence.
  • The idea is to remove the waste so that it remains above the saw blade and to its left and not trapped between the work piece and the fence.   Otherwise, that waste will kick back like a rattlesnake.


  • First Cut:
  • Note: The fence is set so that the blade just touches the board right at the corner.
  • I take one board and sneak up on this fence setting with the blade set just under its required height.
  • The blade depth of the first cut is exactly the same as
  • the thickness of the stock (in this case 3/4").
  • You can also sneak up on this depth until you get it just right.
  • Now cut all eight boards at this blade depth and fence setting.


  • Second cut:
    The rest is a piece of cake.
  • Flip the board over so that you are looking at the opening left by the first cut.
  • Drop the blade down about half way and move the fence to the left about 1/4".
  • The top of the blade should be just under the top edge of the angled cut made on the first pass.
  • Sneak up on this cut, as well, by moving the fence left until the bottom portion of the bird's beak is flat.
  • Now cut all the boards the same and watch the waste fall harmlessly away.

  • That's it.   Your boards are ready to glue up.

    Glue up:
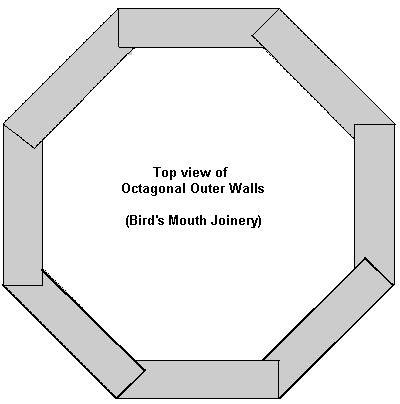
    Attached, is a drawing I made up to show our readers how to make an octagonal column (Bird's Mouth Clamping).   
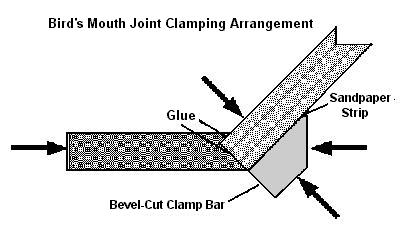
The big black arrows show the directions of the forces exerted by common C-clamps.

  • Two of the C-clamps just hold the beveled clamping board snug to the board at each end with the edge that fits inside the bird's mouth.
  • The other clamps are spaced about 10" apart and exert the force on the joint that connects the mated pair.
  • I also laminated a strip of sandpaper to the beveled edge of the clamping board, but frankly, I am not sure that the sandpaper is really required.   It does seem to help out when setting the clamps.

  • Note: Two clamping boards are going to be needed as you work your way around the octagon.
  • I do four pairs first, which requires only one clamping board, and then glue together two pairs, which requires two clamping boards.
  • The final glue up connects the two halves of the column that I tie together with a rope augured around a half-dozen times or so in a spiral and pulled tight.


  • Final Comments:
  • If your blade was set exactly at 45 degrees when you cut your joints, your octagon will fit together perfectly.
  • I know it sounds like a lot of work compared to a bunch of simple 45-degree bevel cuts for miter joints,
  • but believe me, in the long run it's worth it.
  • Surprisingly, you waste no more stock, and you obtain a much stronger joint.   The shipbuilders made their masts this way for centuries.


  • This site is maintained by:
    Good-Lyddon Data Systems

    Copyright © 2004-2005 Joe Lyddon, WoodWorkStuff.net