|
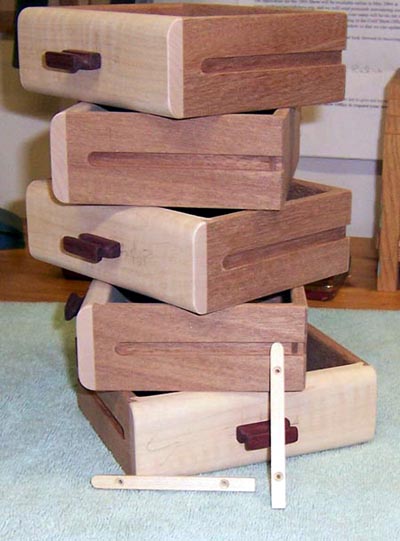
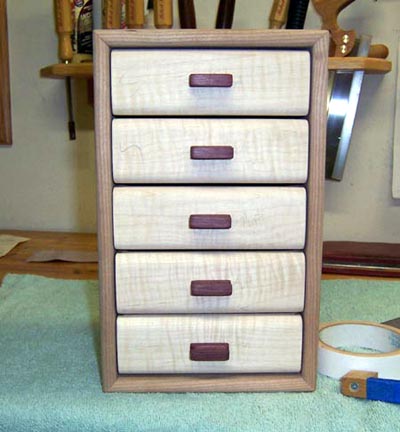
I've been collecting lots of 'how-to' photos for the book I'll never write... so I figure I might as well share them with you good folks. Some of you may recall that I enjoy creating boxes... and in particular boxes with drawers. At the scale I work with, using shop-made wooden drawer runners is an appropriate and elegant method to fix the drawers within the box carcass. After many years of bungling about with these... I have arrived at a method to size and install these wood runners that is robust, accurate and efficient. I'll share that experience with you here... Well... first you need to have a box and some drawers. Once those are in hand... it's time to machine the runner grooves in your drawer sides and build the runners. |
|
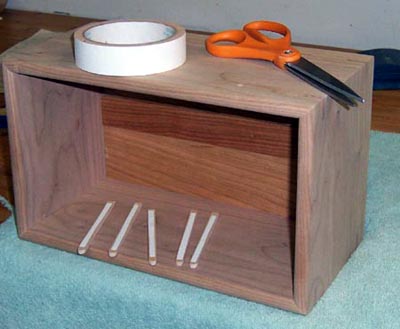
I know... I know... machine made drawer joints! Please keep the grief to a minimum by recognizing that not everybody wants to pay the premium price I demand for hand-cut d'tails. Here is I how I size the grooves and runners... The grooves in the box sides are 5/16" wide and made with a carbide spiral straight router bit of that diameter. I stop the grooves about 3/4" or so back from the edge of the drawer fronts... and make them about 1/2 of the side thickness in depth. Since I use 5/16" thick material for the drawer sides... the grooves are about 0.160" deep. To be Continued... Knipfer woodshopdemos, 03-11-2004 11:59 AM Dave, Thanks for sharing. Question: Do you worry about wood shifts and what do you use for finish - oil? Does an occasional waxing by owner keep them running smoothly? John Lucas Continued... The runners are made from maple in this case... and I size them to allow for 'sufficient' opening clearance for the drawers. First... they are the same length as the grooves in the drawer sides and the front end is rounded to match the round groove end left by the router bit. The thickness of your runners needs to be determined based on how much clearance you have between the drawer sides and the edge of your box carcass. Obviously... if the runner thickness is LARGER than the available clearance... well... the drawers won't fit. I choose to leave 1/32" clearance between the runner and bottom of the groove on each side of the drawer... that is... my drawers can 'rattle' left and right by a total of 1/16". I make the width of the runners about 0.270" ... this also gives 1/32" clearance along the length of the runner/drawer interface. Since gravity always acts downwards... this clearance is not seen to the eye as 'slop' ... but instead allows for seasonal expansion/contraction of the drawer sides. Finally... two holes are drilled and countersunk into the runners to allow for installation screws... I use #2 wood screws... so the front hole is drilled with a #44 (3/32") bit and the rear hole is drilled with a #30 (1/8") bit. This allows the front of my runner to remain 'fixed' while the rear 'floats' in the slightly oversized hole... allowing the box sides to expand/contract without damaging my installation AND keeping the drawer fronts in alignment. Thats the design considerations... now to install them... To be Continued... Knipfer Ron50, 03-11-2004 12:08 PM Dave Do you put some kind of stop on the drawer also? Ron Continued... I install the runners in the box by using a system of spacers and double-sided tape to temporarily fix them in place until they look right to my eye. First... the back of each runner gets a length of double-sided tape... |
|
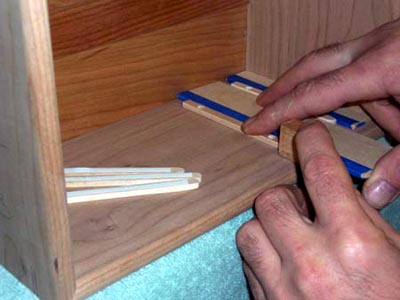
Then you are going to need three spacers... these are used to locate the position of the runners vertically in the box and also to establish their depth in the box... |
|
Here you can see all three of the spacers in action. Two of them are used for the runner-to-runner clearance... One of them is used to locate only the first runner... you can see it in the photo pinned between the runner and the box bottom. The second spacer is used to locate every other runner relative to the one before it. You can see this one in the photo locating the second drawer runner. The third spacer locates the end of the runner relative to the box front... it allows me to place all the drawer fronts where I want them and at the same location. To be Continued... Knipfer Lomax, 03-11-2004 12:15 PM I must stick me head in here before Dave finishes in part as a response to John. When I first built boxes with wooden runners as Dave is describing, I started with clearences similar to Dave's and before finishing, the drawers stuck like mad! I thought the S**ks and kept removing material until the drawers slide OK. Any more material and they might not have stayed in place. Then, after finishing and applying a bit of wax, I was unable to keep the drawers in place if the box was not inclined slightly. They ran too smoothly. So, stick with DaveK's dimensions and relax. Things will work fine when the finish is on and a bit o' wax is used. Lomax Continued... Don't be confused by the super high-tech appearance of these spacers... they are scrap pieces of whatever I had that are made to fit the need. The only 'mathematically challenging' part to this entire method is figuring out what spacer dimensions to start with... I'll leave that part to you... but I will say that your spacers need to be sized so that each drawer has an equal clearance and the drawer fronts stop where you want them to. For Ron50... yes... the drawer stops are when the front of the drawer groove hits the curved end of the runner... no other stops are needed. I size my drawer length to leave a little clearance at the back of the box when they are fully closed... soooo... 'built-n' stops with this method. The blue tape you see on the spacers in my low-tech shims used to get the spacer dimension just right. In practice... the first time you build a box... you will need to estimate the spacer dimensions... place all the runners in location... and see how the drawers look. Most likely you'll be off the first attempt... so you will need to add or subtract masking tape and try again... thats why we use double sided tape to start with. You do want to be careful when locating the runners using the spacers that they are placed straight and square to the box front. It is very easy to have one edge of the runner slightly offset from the spacer... it's actually a three hand operation trying to hold both spacers AND fix the taped runner in place... The problem with ignoring this is that we are using RELATIVE dimensioning here... that is... each new spacer is located relative to the subsequent one... so any error adds up and quickly can become huge. Soooo... take the extra 5 seconds to check each spacer to be sure it's OK... if it's off a little just pop it off and re-set it. |
|
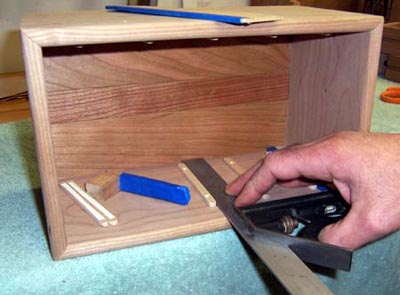
Now... once you have all the runners in place... slide your drawers in and see how they look... we are now concerned about visual tolerance... do they look good or not? No worries... the double sided tape will hold your runners in place just fine... as long as you don't drop the box. DAMHIKT |
|
As I said earlier... unless this is YOUR LUCKY DAY... its unlikely that you will have guessed the exact correct spacer dimension the first time out. Focus on the gap between the top of the last drawer and the box edge... thats where all your error is going to show up. Why? ... because since we used the same spacer to locate each runner... and since we are sure they are square... all the error shows up at the end. If that last gap is obviously larger than all the rest... add some shims to your spacers and try again. If that gap is obviously smaller than all the rest... remove some shims from your spacers and try again. When it looks good to your eye... then we fix the runners in place with screws... Here is a what I use to install them... |
|
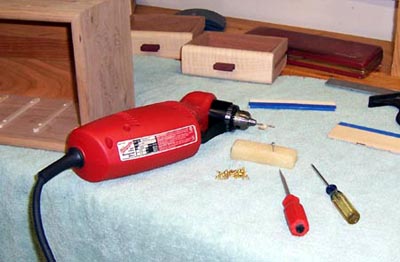
That's a right-angle drill able to fit into tight places fitted with a #52 drill bit (the correct size for #2 screws into hardwood) and an piece of masking tape on the drill as a flag to keep me from drilling thru the box side. My preference is to use brass screws... I admit there is no design advantage... but my spirit won't allow me to sell expensive little boxes with steel hardware in them. Soooo... I also use a steel #2 wood screw as the starter screw and a block of pure beeswax to lubricate all the threads. I'll take it on faith that everyone out there can get those screws in without photos from me... my only caution is to use the starter screw and beeswax on every hole... it is a very, very frustrating experience to have to remove a broken screw in this situation. Once everything is screwed down tight, you will end up with a situation exactly like Mike Lomax wisely mentioned... The drawers will open and close, but you'll think they are a little tight. I have found that once I follow my normal finishing routine... shellac followed by 6 coats of oil... then a coat of Renissance Wax on the runners as a last step... The drawers open and close smooth as glass and the clearance I use provides a good comprimise between the visual need for things to be 'tight' and the reality of expanding/contracting timbers. That's it... now... go make some boxes and show the photos! Enjoy. Knipfer   This site is maintained by: Good-Lyddon Data Systems Copyright © 2004-2005 Joe Lyddon, WoodWorkStuff.net |