|
Back to the previous step in this series. General Views on Shellac Finishing jlish, 01-10-2004 08:24 PM Dave, does the oil still penetrate after putting on the seal coat of shellac? What oil finish do you use? Thanks Jim daveknipfer, 01-10-2004 09:04 PM Sure it does Jim ... just not as much penetration as without the shellac. Using shellac, as a seal coat, is a compromise that I knowlingly make to solve other finishing problems. IMHO .... Bubinga is a timber that reacts poorly to a straight oil finish .... maybe it's due to the natural oil content to begin with? Anyways .... my experience has been that a light coat of shellac to begin with allows me to apply my favorite oil finish to Bubinga without much troubles. What I DO give up is some depth of penetration and subsequent grain popping. I also use shellac followed by oil on many other timbers as the first finishing coat .... Cherry to reduce splotching .... Maple to keep it 'whiter' .... Padauk to reduce the dust migration .... Zebrawood to make it shine ... etc. In each case ..... I accept slightly reduced oil penetration in favor of the benefits the shellac imparts to the overall finish. At this point, I have been using the oil finish made famous by Sam Maloof .... I mix it up on my own .... equal parts Tung Oil, Boiled Linseed Oil, and Poly. Knipfer TTalma, 01-12-2004 11:56 AM I was reading some of your other posts about oil over shellac finsh. I am interseted in trying this. Would you mind giveing a step by step description of how to do this, like what mixes, what to look out for, etc. Also you had metioned you used boiled linseed oil for your oil mix. Can you buy this premade or do you need to make your own. daveknipfer, 01-12-2004 01:15 PM Well .... OK ..... let's see if I can address that. First of all, I do not use a shellac seal coat on EVERY timber ... some seem to get along just fine with an oil finish without going through the extra work. I use the shellac as a problem solver to improve the overall look of the finihed item for those timbers that need it. I say that a new timber to me is a candidiate for a shellac coat if a straight oil on raw wood finish is either blotchy or soaks up a bunch of oil coats like a sponge without ever truly looking 'finishing'. In my experience, I use shellac any time I use any of these timbers .... Maple (hard or soft), Cherry, Red Birch, all Spalted timbers, Padauk, Zebrawood, Ash, Olive, Eculyptus, and a host of less common species. You'll just have to play around for yourself and see which timbers this process helps with in your work. That said ..... here is what I do ... 1. I sand the project to whatever level is needed .... usually thru 220 or so. 2. I keep a supply of 1 lb cut shellac in my finishing area. I mix my own from raw "Super Blonde" flakes and de-natured alcohol. I prefer the 'super blonde' grade of shellac since it is highly refined to remove nearly all the amber color in the shellac and also most of the wax. It's a more expensive grade but leaves my timbers practically unchanged from their natural colors and textures. I suppose, if you buy pre-mixed shellac in a can, you can also buy this grade but I'm not certain of that. Be aware that shellac goes bad over time and will eventually turn so that it will no longer cure. I've heard anything from 6 months to 2 years for a shelf life. I don't take any chances for the $2 a jar it cost me ..... when I make a new batch I stick a piece of masking tape on the jar that has the date I mixed it up .... if there is any left after 6 months I throw it out and start over again fresh. 3. My method for applying the shellac is what I call the 'rude and crude' style. A finishing purist would cringe but it works for me ... I put on a pair of disposable gloves (sticky stuff that shellac) and grab a clean cotton rag. Pour a little of my shellac stock into another container and dip the rag into it. Then, I just cover the entire project with the shellac. Simple as that. No .... I do not go through the big ritual of removing all the dust, making a proper wadded rag, using a fine china bristle brush, careful to not overlap the strokes, etc. I just rub the stuff all over the project and let it sit overnite to cure. The next day, my project feels quite lumpy (that is where all that dust went!) so I buff the entire thing down with #0000 steel wool until it is smooth as silk. I'm not worried that I'm removing the surface layer of shellac by rubbing it out.... thats OK for my purpose .... I'm interested in having the seal coat in the upper pores, not trying to build a final finish on the surface. Please note that if you were interested in a shellac only final finish you would want to be a little more considerate of how you apply this first coat. 4. Then it's on to the oil finish .... I used to use Watco Natural as my oil of choice and it works just fine. In the past few years I have favored the oil blend made famous by Sam Maloof ..... this one you can mix up yourself or buy it through Rockler's. Maloof's oil finish (part A) is a mixture of equal parts of boiled linseed oil, pure tung oil and polyurethane. Yes TTalma .... you buy the boiled linseed oil that way. Technically it's not 'boiled' any longer, metallic dryers are added to the pure linseed oil to speed the cure. In the old days the oil was 'boiled' to get the dryers to absorb, but that is no longer done although the name has stuck around. Also .... you want to use PURE 100% tung oil. Read the label .... most of the 'tung oil' sold out there is tung oil thinned with something else to make it flow easier. Those will not work in this mixture. Anyways ... put those three ingredients together in a plastic container and shake them up .... voila ..... a lovely oil finish. 5. The oil finish itself is easy to use ... Gloves again, then wipe a coat of the oil all over the project. BTW .... this is my favorite part of WW ...... seeing the figure pop with that first oil coat .... Let the oil soak in for about 5 minutes then wipe it all off. Simple as that. Repeat every 24 hours until you have the sheen you desire. I usually go for at least 3 coats of oil ... sometimes more. A few cautions are in order here ... First, be aware that the oil will have a tendency to bleed back out of the pores on certain timbers as it cures. You need to check the item for the first 6 or 8 hours after an oil coat and be prepared to wipe those bleed spots off again or they will cure as lumps and require sanding off the next day. Second, those oil soaked rags are a hazard for self-combustion. I won't go into the chemistry involved here .... suffice to say that if you leave them crumpled up in a corner they CAN develop enough internal heat to start a fire on their own. If you decide to use any oil finish .... then you MUST develop the discipline of spreading the oil soaked rags out until they cure. Personally, I drape them open over the edge of my shop garbage can and throw them out the next day when they are stiff. Thats all I can think of to say .... give it a try ... you'll enjoy the look of this finish. It leaves you timbers fully finished, smooth as silk, with a lovely light sheen, while maintaining the natural colors and textures. Knipfer TTalma, 01-13-2004 09:54 AM Dave thanks! I am working on a couple of cherry pieces. I will try your method on them. (Scrap first of course) DanM. 01-13-2004 10:49 AM Dave, Pardon my ignorance on this subject... I've never used a shellac seal coat, although I'm certainly going to try it! Here are my questions: 1. Does the oil finish still have that grain-popping effect after you apply a seal coat of shellac? 2. Does the application of the oil soften the shellac at all, as a new coat of shellac would? Thanks, Dan daveknipfer, 01-13-2004 08:28 PM TTalma .... I don't know how you normally finish your Cherry .... but it looks like this with a shellac seal coat and some oil .... OK DanM .... here is my thoughts on your questions .. 1. Yes ... the grain will still POP, just not as much as raw timbers will. Like I said in an earlier post ..... I use the shellac seal coat to eliminate finishing problems on those timbers that need it ..... so I intentionally give up a little oil penentration for a better overall finished product. From my perspective ... I would much rather have a clean and uniform finish than a more spectacular but blotchy one. 2. Once the shellac is cured it's cured ..... the oil finish will not affect it all. I give the shellac overnite to cure ... but then I always use fresh shellac. Knipfer Topic: Shellac BEFORE the Oil to "Pop" the Grain - Picture some Results daveknipfer, 03-12-2004 07:52 PM Recently, I have responded to some finishing questions and suggested my admittidly unorthodox method of finishing highly figured timbers .... shellac FIRST .... then oil. I recognize that this approach seems wrong .... the theoretical idea behind 'popping the grain' is to get as much oil as deep into the timber as you can ..... But ..... I stick with my crazy self-learned method ..... and offer the following photos to give you an idea of what this technique can produce on highly figured timbers. It's difficult to capture 'figure' in a photo .... so all of these were much more alive than these photos show ... But ... tell me ..... do you believe this grain is 'popped' enough? Ceylon Satin Wood drawer fronts .... a 'soft' timber ...  Curly soft Maple drawer fronts .... 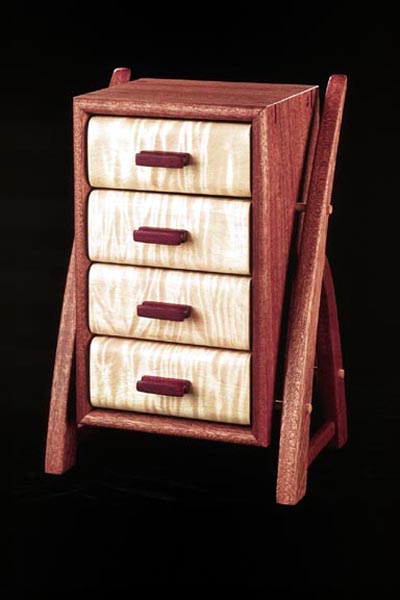 Curly Olive door panels .... 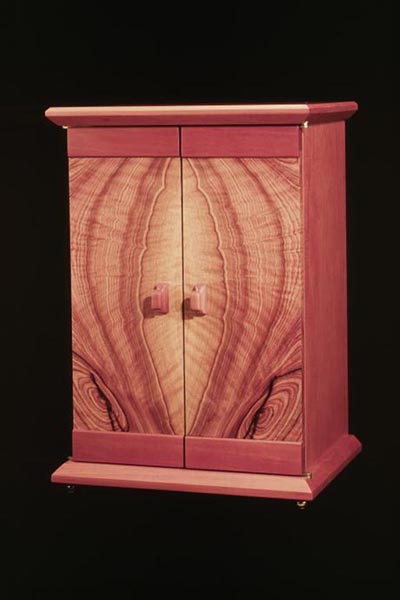 These boxes were all finished the same way .... my 'rude and crude' shellac coat followed by 6 coats of home made oil. Sooooo ... next time you have a fine piece of figured timber in your hands ... .. I say that you owe it to yourself to at least give this method a try ..... it's a foolproof way to achieve what I believe is a pleasing finish ..... as long as you don't mind a little honest elbow-grease effort. Knipfer On to the next Part of the Series.   This site is maintained by: Good-Lyddon Data Systems Copyright © 2004-2010 Joe Lyddon, WoodWorkStuff.net |