20's Style Rocking Chair
By Lynford Disbrow
September 2005

I built a wall of bookcase/storage cabinets for a customer (Jenna and Blair).   LOML helped me install a corner upper which was a real bi**** to get to.

Jenna to LOML,
"Have you seen the 20's style rocking chair my grandfather left me?"

LOML,
"No."

Jenna, showing the chair to LOML,
"Do you like it?"

LOML,
"That's a darling rocker.
Lyn, why don't you ever build something like that?"

Lyn,
"Duh?"


LOML said,
"I would rather have the rocker instead of the coffee table on the To Do List".

Normally NO, but considering this 'customer' is also a great help and LOML.   "Of Course", I said, and the coffee table went to the end of The List.

So that's how I got this job... this is a woman's rocker while a mans rocker would be bigger and not so ornamental


Here is one side piece during construction...


There are several differences between this one and Jenna's original.

  •   1. The rockers are wider to better work on carpet.

  •   2. The rockers are sculpted into the legs (Thanks Sam).

  •   3. The seat is a bit wider and one inch taller.

  •   4. The finish is Sam Maloof.   The following pictures are from only two coats of Poly/ oil.   This chair will get two more coats of Poly/Oil and two or three coats of SM wax/oil and good buffing.

  •   5. The rockers and the two back pieces are epoxy laminated in stead of cut from solid wood.

  •   6. I used Miller stepped dowels which replaces screws and plugs.


  • Here is the front view.


    It is Walnut, like the original, but the original has an opaque stain and only shows grain in the worn parts.   That was the finish style then;   oil and/or varnish (almost clear) is the finish style now.


    BTW: What doesn't show in the original photo is the seat grain is side to side and attached to long grain (wrong) to the sides.   It came apart with wood movement and has been nailed together a couple times with cleats.   I took special care about wood movement with our rocker.


    And the left side view.


    I don't know what those little circles of wood are for.   In the original, like mine, they were part of the arm.   At one point we thought about just cutting them off and then decided to keep them just to keep closer to the original.   They might be effective to keep little kids on your lap so they wouldn't wiggle out under the arm.


    Construction:
  •   Sides, with 6/4 Walnut planed to 1 1/4" cut on the bandsaw and dowelled together with 1/2" dowels.

  •   Seat, three pieces of 8/4 dowelled together (Careful here...

  •   Keep dowels toward the bottom because the seat top will be contoured)

  •   Used an angle grinder and coarse disk to form the top of the seat.

  •   I did not want any extreme contours like Sam Maloof rockers.


  • The seat isn't that light in respect to the rest of the chair...   lighting in the shop I guess.


    Here is the right side.


  •   Rockers, cut three pieces of MDF and face glued them and roughed out the rocker curve for a form.

  •   Sliced some 8/4 to 1/8" slices.

  •   Put stretch wrap over the form,

  •   mixed about 4 oz of West System epoxy with 206 hardener (1/2 hour open time),

  •   painted the strips with epoxy,

  •   used stretch wrap over the strips too and clamped the strips to the form.

  •   Wait till next day,

  •   do same with other rocker.


  •   Arm rests are two layers of 6/4 face glued and contoured on the bandsaw.

  •   The side edges were done with a 3/4" roundover bit.

  •   Careful not to roundover where you need a flat like the arm rest connection, seat connection, etc.


  •   The lamination of the back pieces are about like the rockers.

  •   There is a lot of chisel, rasp and file work too.

  •   Of course, soft sanding blocks in 120, 180, 220, 320, maroon scotch pads finished it up.

  •   If you use power sanders like ROS, go slow else you will have curlies in the wood that require a lot of hand sanding to get out.


  • Here is the back detail.


  •   The two back pices are curved to a 21" radius.

  •   I needed a way to connect them so I used a curved stopped tongue and grove.

  •   Tricky cuts on the router table, not recommended for new guys or the faint at heart.

  •   The tongue is about 3/4" long.

  •   The center dowel is with only a small hole and glued while

  •   the two outside dowels go through elongated holes in the tongue to allow for expansion and

  •   not glued except for the head of the dowel.

  •   The arms are attached with Miller Dowels too.


  • I think the main thing about getting a job like this done is

  •   to get organized about what has to be done.
  •   Resaw the lamination pieces and the MDF forms.
  •   While the epoxy is curing (a day), bandsaw all the curved side pieces a bit large to trim during assembly,
  •   While the next lamination is drying, dowel all the side pieces and assemble the sides.
  •   Just plan your time and you can get all those pieces into a rocker in a week of 6 hour days...
  •   don't forget Oreos and milk and a nap in the afternoon.   That is, if you are over 65 and understand what is important.


  •   Construction actually goes pretty fast.
  •   Detail and finish take a long time.
  •   Four 6 hour days clean it up pretty well.
  •   Finish only takes an hour or two a day but goes on for five days.
  •   All up I estimate 65 hours or so.


  • Sweet rocker.

    I like how you softened the edges a lot more on your rocker compared to the 'original.'   Much more inviting to sit in and on the eyes.   I like the bookmatch for the back slat...   but the upper rail in the seat back...   looks like it is going up and to the left when viewing from the front of the chair.

    Tim

    Yeah Tim, it is high on one side.   That's why I will build another someday and this one will go to some customer that wants it down the road.   LOML didn't notice that defect but I should have and cut the board at an angle to make the grain grin straight.   That is a six piece lamination and the back of the top piece is straight... duh!


    Another problem.
    Most of the wood except the laminations is 6/4 and there is quite a bit of it and a lot of waste due to curved pieces.   about 30 bf Walnut ($120 here from my supplier) and by the time I have it buffed out, I will have 65 hours in it @ $35 so the total tab for the rocker will be about $2400 - $2500.
    Next one will go faster of course.

    Later

    Lyn Disbrow (Woodworker)

    Really nice.
    Just wondering what is involved in designing something like that.   Since it was essentially a custom size, how did you determine all of your dimensions?   Did you do a full scale drawing or use software or what?   Also, what tools were used to do all of that curved shaping?   Did you use spokeshaves or what?   I'm asking because I am striving to get to the point where I can break out of building square and rectangular objects and take on shapely furniture like chairs.
    PaulComi

    Hi Paul,

    Design?
    I cheated.
    Since I had access to the original I sketched a few patterns onto tracing paper.   It could have been done from a couple photos and then take the seat size and angles from a known rocker.

    Lyn Disbrow (Woodworker)

    Thats a great piece.
    Someday I may be good enough to consider a project like this.   But I'll probably chicken out.

    MPhillips

    MPhillips,
    This rocker and all the other things I have made are just wood.   There is nothing to be afraid of.   Being a FAC in Viet Nam was scary... woodworking is not.   So what if you waste some wood... no BFD.   You got to try or you will sit on your can and watch other woodworkers build better and better projects as they learn more.

    Go to the BORG, buy some lumber and cut out a rocking chair...   Yeah, it will be a POS...   get some Alder and cut out another rocking chair...   it will be better...   get some Walnut and cut out a rocking chair...   it will be OK. Just keep doing it...

    Don't feel like the Lone Ranger, you have lots of support here and with local woodworkers.   E-mail someone who has made a similar piece.   No one learned this without a lot of relative failures but don't forget it is just wood.   Do be careful because fingers are hard to replace but more wood is as close as the next lumber yard.   Don't ever think about "Chicken Out".

    Lyn Disbrow (Woodworker)

    That is such good advice I am going to print it out and post it on my wall to remember.   The belief that every project and every part being produced has to be perfect can be really limiting and even with something simple like the Adirondack chair I just built, I know the next one I build is going to be better because I can picture the steps of making the chair in my mind and can remember some things that happened the first time around that I would do differently.   The ironic thing is that part of the thrill for me of doing woodworking is not knowing how something is going to turn out because it is the first time building it.   The second time it becomes more like just straight work.   The first time through, I work in quiet without distractions and have a sort of butterfly feeling in my gutt like "did I cut that right?" but the second time around I've got the radio on and I'm doing multiples and batching parts through phases like bandsawing, routing, and finishing.
    Its just wood.
    If a mistake happens, buy more.

    Paul


    To this end...   it is good/wise/smart to keep some notes of your project, especially when beginning in woodworking.   I do this because sometimes I go for several weeks without getting time in and I anticipate that years down the road I may want to 'recreate' and old project.   Having some notes written down - especially concerning mistakes/difficulties/design issues - for later perusal is good.
    Hard to remember everything forever.

    Tim


    Lyn, We're on the same page; I'm not into this to make assembly line things.

    To the point Tim made, I do the same sort of debriefing of details as I build anything out of wood.   The reason I write articles and post them with pictures on my website is to remember how I went about building a project and so that I can look in hindsight at difficulties or things I would approach differently if I were to be faced with similar work.
    Paul

    Paul, the woodwork is in the details.   Yes, you can build multiples of chairs or cases like kitchen cabinets and lots of doors and drawers...   that is one type of repetitive woodwork.   I have wasted too much of my life doing things like that but at the time it was a living.

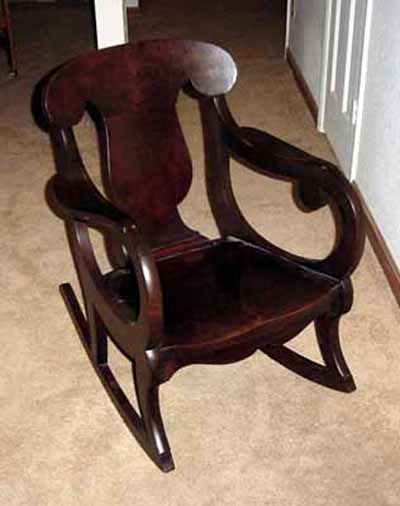
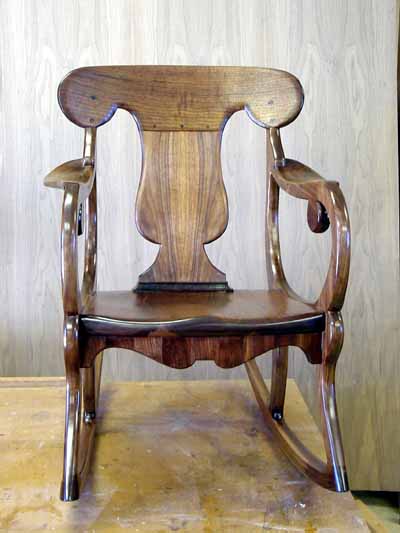
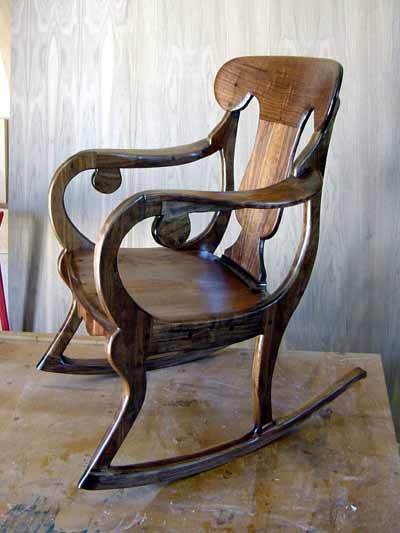
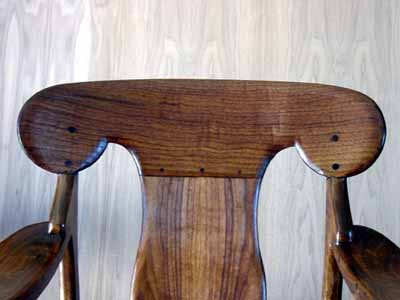
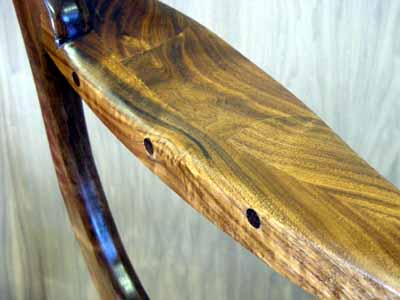
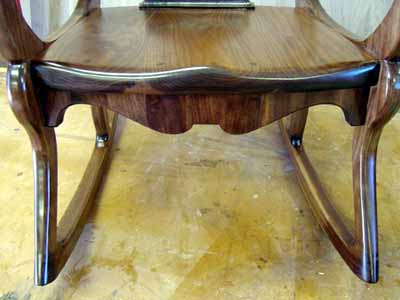
    When I build the next rocker like this one, I will fair out a couple curves that are a 1/16" too sharp, 
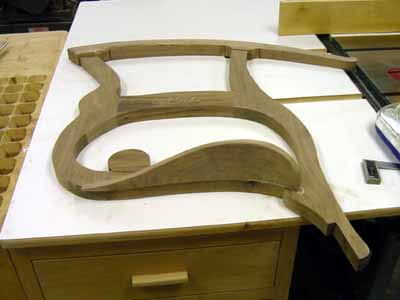
make the arm rests out of one piece rather than glue two together, sculpt out the connection between the top back and the vertical sides, keep closer tabs on the back grain.

    This one is not gross but could be better.   These are details that refine the work, not manufacturing more of the same.   I have mentioned "Build Another" as advice in several threads to a lot of people.   I don't mean literally build another, I meant build another better in the detail, grain match, etc.

    I find that about the third one, call them prototypes, and it is about a good as I can make it.   I leave it there unless someone really really $$$ wants one.

    Cheers,
    Lyn Disbrow (Woodworker)

    The front skirt is coopered and attached with Miller Dowels.

    LOML likes the little rocker and it fits her perfectly.   Hope you enjoyed the little story.

    It was a fun project and got me out of the straight lines found in most cabinets.   While I am finishing the rocker I am building a 33W 48H 18D Walnut stereo equipment cabinet with pocket doors, six CD/tape drawers down one side and shelves on the other side.   To make the cabinet work with pocket doors, it will be a cabinet within a cabinet... more fun.

    Thanks for looking

    Thanks for all the nice words guys.

    I usually forget to take pictures when I am working so I can't give you a blow by blow pictorial.

    But you should get the idea from this quick senerio.

    Now, back to the shop for the next adventure...   Oh yes...   pocket doors and interior cabinet.

    Later

    Lyn Disbrow (Woodworker)


    This site is maintained by:
    Good-Lyddon Data Systems

    Copyright © 2004-2010 Joe Lyddon, WoodWorkStuff.net