Making Segmented Bowls Simple...
Part 1

By oxhoward, Adam Howard
August 2005


I was asked to do a short tutorial on making segmented bowls...   so here's my feeble attempt...   I'm not an expert, and mine may not be the best way.   This is simply my approach.

Segmented bowls aren't as hard as they look.   They take lots of time, and a little patience.

As far as basic equipment, you need:
  • a good lathe,
  • chuck / faceplate,
  • tablesaw or mitersaw, and a
  • good miter gauge.

  • As always, make sure everything's tuned up, ready to make accurate smooth cuts.

  • The basic idea, as most of you know, is to take perfectly good timbers and chop them up into little pieces, glue them back together, and make them round.   There are lots of good books and endless designs.

    For this project, I'm selecting a simple but IMHO elegant design.   There's room for improvement, but I'm new at this, too.


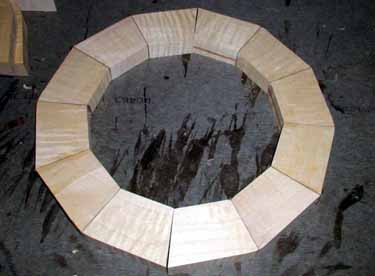
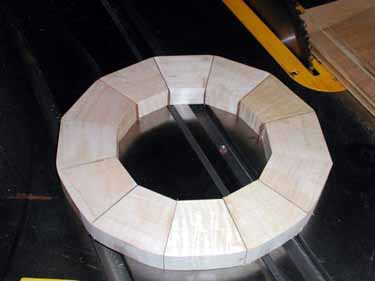
    First, decide how many pieces per ring.
  •   Divide 180 by that number, and you have the angle to use.
  •   I'm doing 12 sided rings, so 15 degrees.

  •   Figure out the circumference of the circle.
  •   The formula is pi * diameter = circumference.
  •   pi = 3.1415

  •   Take the circumference and divide by the number of segments, and you get the length of each long side.   Neat, huh...

  •   For the width of each piece, I select 1.5 - 2".
  •   That gives me plenty of room for error.   I'm just not that good yet to chance it.


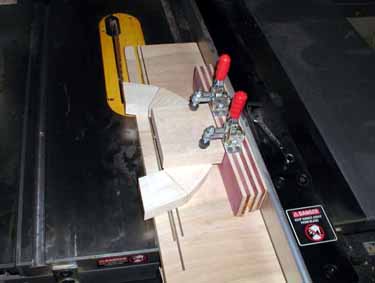
  •   Draw it out on paper, and
  •   come up with a profile.
  •   That way, you can figure out how big to cut each ring.

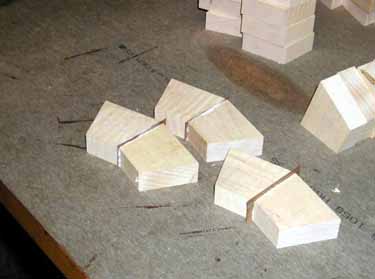
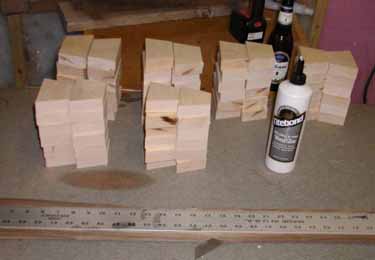
  •   Cut out your segments using whatever method you prefer.
  •   I used my miter gauge, a stop block, on tablesaw.

  •   A word about accuracy.
  •   In order to cut perfect rings, you have to have a perfect angle.
  •   The more segments in a ring, the greater the error.
  •   For a 12 sided ring, the error is multiplied 24 times -
  •   2 cuts each piece.
  •   If you're accurate to 0.001", you could be off by 0.024" in the end.
  •   That's large enough to see visible gaps between the mitered cuts!

  •   There's a way around it, so just
  •   get your setup as close as you can, and cut your pieces.

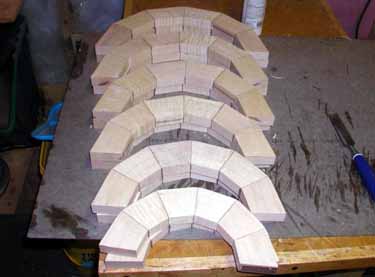
  •   Now that you have them cut out... It's time to setup for glueing.

  •   My design will be a "brick wall" pattern,
  •   with a contrasting veneer in-between each piece.

  •   Get what you need.
  •   A good straight edge,
  •   glue,
  •   sharp blade,
  •   veneer,
  •   pieces, and a
  •   cold adult beverage, because this is the TEDIOUS part.

  •   Regular PVA glue is okay.
  •   I chose clear Moulding and trim glue by Titebond, because it sets almost instantly.   Time will tell if this was a good choice.   It seems as strong as any other PVA.

  •   Glue the pieces together in two's.
  •   Press together for about a minute, then
  •   set aside on a flat surface.
  •   Check every few minutes to be sure the veneer hasn't moved.
  •   After about 5 minutes, it will be good.
  •   I worked out a system where I was glueing one piece,
  •   then checking the other, so
  •   I had three going at the same time.

  •   Now that you have some pairs glued up, you can
  •   put those together an make fours...

  •   Then...
    No, don't make 8's for a 12 sided ring...

  •   I'm shooting for a half ring exactly.
  •   Yes, I had to disassemble some because I got glue-happy.

  •   Get all those half rings done.

  •   By quickly fitting those together,
  •   you can clearly see the error in cutting and in your glue-up.   Don't worry.

  •   There's a simple solution, and
  •   you'll have to make a jig.
  •   To get the pieces to match, we need to true-up the halves to be 180 degrees exactly in order to fit together.

  •   Make a fence on a board, and put some toggle clamps on.
  •   These will secure the ring to the jig,
  •   and allow you to cut the halves on the tablesaw to true them up.
  •   Basically, you're jointing the end grain.

  •   A board placed up against the other side of the blade will
  •   help you align the halves on the saw if the rings are large.

  •   Make as light of a cut as possible to achieve your goal of trueing them up.
  •   Take as little off as you can.
  •   Mine averaged about half a kerf.

  •   You can also do all this on a disc sander, but mine's not that big.
  •   For this bowl, the largest diameter will be around 16".

  •   Once you've done that, check the fit of the rings.
  •   Then you can glue them up.
  •   A band clamp helps.


  • Well...   that's it for this edition.   I'll post the rest in a few days, so stay tuned if you feel like it.

    oxhoward... Adam Howard


    This site is maintained by:
    Good-Lyddon Data Systems

    Copyright © 2004-2010 Joe Lyddon, WoodWorkStuff.net