Making Segmented Bowls Simple...
Part 2

By oxhoward, Adam Howard
August 2005


Click here to see Part 1...


In the last part of this demo,
  •   I made the rings, and
  •   showed how to make two unequal halves join for glue-up.

  •   I glued up the rings, and
  •   passed them through a drum sander
    (Thank you Jerry at Woodcraft)
  •   to make them perfectly flat for glue-up.

  •   I have used my planer a time or two for flattening rings, but you have to be careful and take very light passes.   And there is always a chance for tearing, so if you do that, it's at your own risk.

  •   A drum sander works so much better, and will be my next large tool purchase.

  • The "Brick Wall" design requires layers of veneer to be glued between the rings.   This would be easier if the bowl wasn't going to be so big, or if I had some really wide veneer.   Since neither of those is true, It makes a bit more work.
  •   I had to secure veneer to each ring before I could glue them up.

  • To make things simpler,
  •   I cut out some MDF Circles using the Bandsaw and
  •   then used the lathe to true up the circle.
  •   I cut it just big enough to hold the largest ring (16").
  •   I found that I needed two MDF circles to cover all the different sizes of rings that needed veneer.
  •   The circles used are so equal, clamping pressure can be applied all the way around the ring, and
  •   clamping access is easy.


  • To apply the veneer,
  •   join the veneer together with painters tape,
  •   apply glue to the ring,
  •   place the veneer on the ring, and
  •   use the flat MDF circle to press the veneer flat on the ring.
  •   Don't forget a layer of waxed paper!   You'll be sorry if you do, DAMHIKT.


  • Are there EVER enough clamps?


  •   Once you have the largest ring done,
  •   un-clamp,
  •   but don't remove the tape.
  •   If you're careful and cut the veneer out of the inside of the ring,
  •   you'll have a circle of veneer that is big enough for one of the smaller rings.
  •   Now you can take off the tape.
  • Once the rings are glued up with a layer of veneer each,
  •   I started joining them together.
  •   I used a neat clamping setup I found in a book.
  •   This method can also be used for the veneer stage, if you're not worried about salvaging veneer.

  •   The clamping jig is simply a piece of 3/4" all-thread that
  •   goes through the benchtop, and
  •   is used to provide equal downward pressure around the ring.
  •   Laying MDF on the bench, and from above, helps keep everything flat.
  •   Take care to keep the rings as centered as possible.

  •   When you glue rings together, always offset the glue lines.

  •   I glued up the rings in two sets of three rings, then
  •   joined those two sets together using the same setup.
  •   For the base, I applied a waste block to a nice piece of curly hard maple, and
  •   turned it round on the lathe.
  •   With the faceplate still attached,
  •   I glued up the base to the stack of rings
  •   using my drill-press as a clamping jig.
  •   That handy MDF circle helps out again.
  •   With the stack glued up, I mounted it to the lathe.
  •   Whew!
  •   I was amazed that it was fairly balanced, and ran reasonably true.
  •   A little out of balance, but not bad at all.
  •   The turning started by true-ing up each ring.
  •   No need to worry about form at this point,
  •   just true it up from the outside.
  •   Now true it up on the inside.
  •   Go back to the outside, and trim up the corners and
  •   try to make a continuous surface.
  •   The form is starting to reveal itself here.
  •   Get that foot shaped, and
  •   make the form what it should be.
  •   The base shouldn't appear bulky.
  •   Most classical forms have a smaller footprint and are most pleasing to the eye.
  •   Do leave a large enough foot so it will rest easily without falling over.
  •   Get the surface smooth.
  •   Ridges, lumps, and grooves aren't acceptable, and will show up in your final piece if you don't remove them now.
  •   Take the extra time to get it right. Don't hurry.
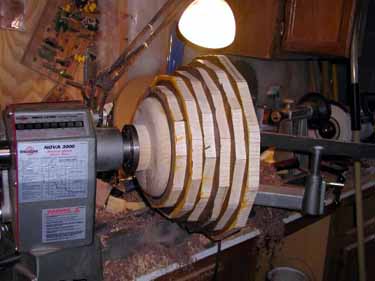
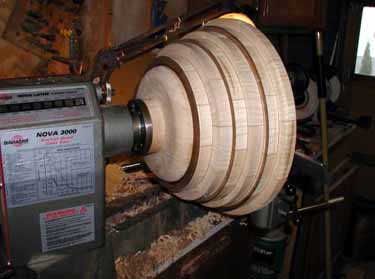
  •   With the outside basically done, turn your attention to the inside.
  •   Strive for consistent wall thickness, and check often with calipers or by feel.
  •   Again, get the imperfections out while you can.


  •   Sand it smooth.
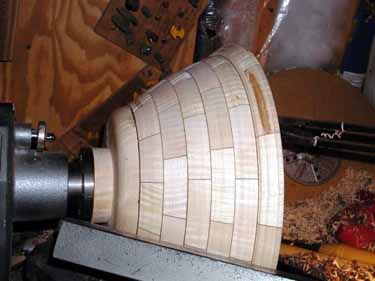
  •   I had a little trouble with chipping out on a little of the curly maple.
  •   It wasn't bad, but sanding would have taken forever.
  •   I ended up using a cabinet scraper with the lathe running at 200 rpm.   It worked great!


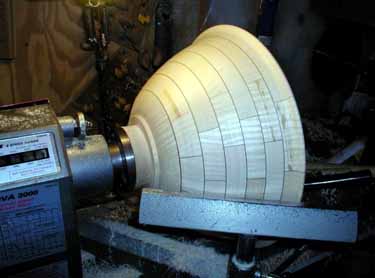
  •   After getting out all the imperfections,
  •   I sanded starting with 120 grit.
  •   Take the extra time at each stage to make sure the surface is perfect.
  •   Progress through the grits to at least 320.
  •   I went to 320, then
  •   turned the speed up to 600 rpm, and
  •   ran with 320 again (an effective finer grit at higher speeds).


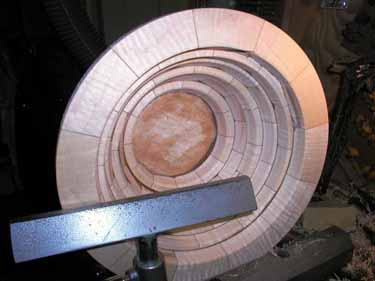
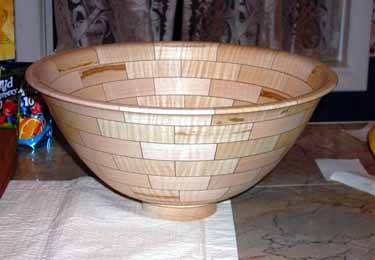
  • All things considered, it came out very well.   The final dimensions are about 15.5 inches in diameter, by about 6.5 inches tall.   Before finishing, I'll reverse chuck by vacuum and take the waste block off, and turn a couple beads on the foot.


    What I would do different...
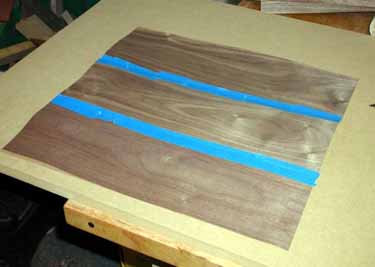
  •   Next time,
  •   I'd be more selective in my stock.
  •   Some Maple Heartwood shows in the final piece, and
  •   I think it would be much better if it didn't.

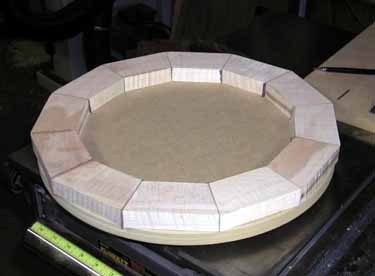
  •   Second, as I get better at this,
  •   I can use narrower rings.
  •   I used 1 1/2 or 2" wide pieces, and
  •   built in a lot of room for error.
  •   Narrower rings and better planning will be less wasteful.


  • Enjoy,
    Adam "Ox" Howard


    Note:
    Permission was obtained from Adam "Ox" Howard to be able to publish his write-ups and pictures.


    This site is maintained by:
    Good-Lyddon Data Systems

    Copyright © 2004-2010 Joe Lyddon, WoodWorkStuff.net