My bent-wood laminated reading lamp,
with aluminum!

By Jesse Silver - Puck
December 2005

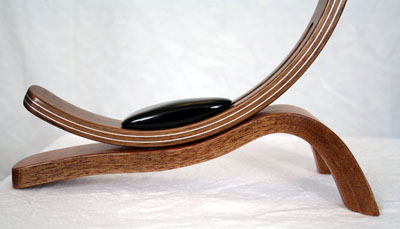
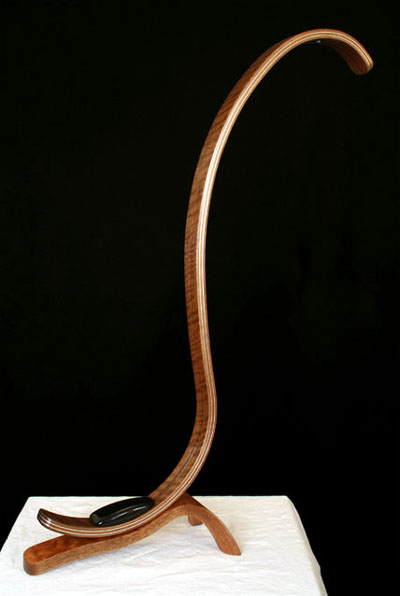
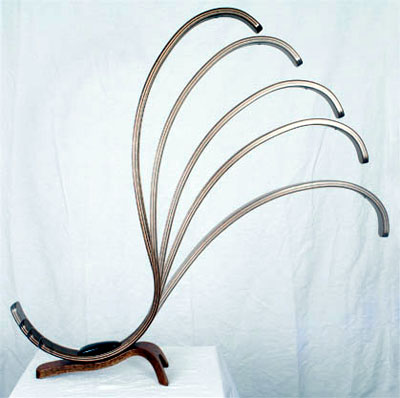
I finally finished an ambitious project of making a bent-wood laminated reading lamp!   
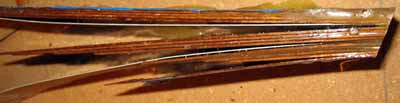
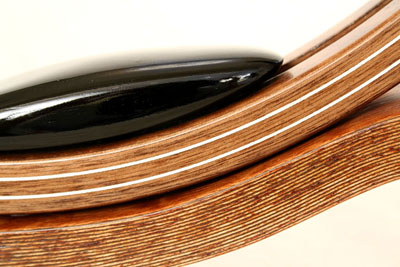
The main arm of the lamp is made from walnut veneers, and faced with curly walnut veneer.   Two of the laminates are aluminum, which is how the low current gets to the LED at the top of the arm.

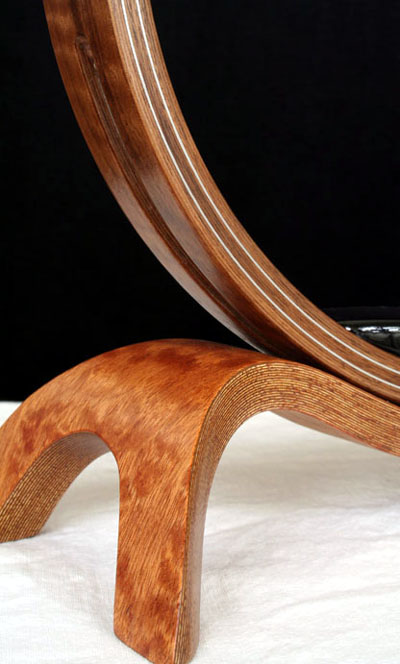
The base is made from layers of mahogany, and faced with quilted Sapele.

A piece of ebony was carved and a nut was embedded into it which captures a hex bolt coming from the base and through a slot in the arm.   This allows the arm to pivot around an imaginary axis.

Anyway, thought I'd put it up here for questions and comments and since I learned a lot doing this and thought I might be able to help somebody in the future.

And yes, the intent was something that was functional, but still largely sculptural.

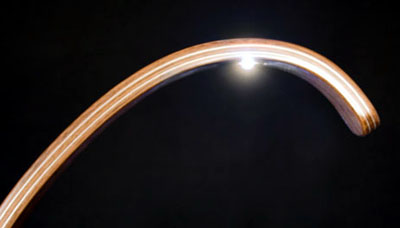
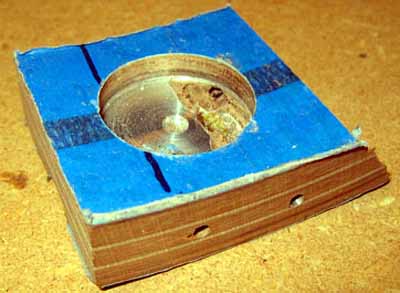
The light is a high-power 3-watt Luxeon LED.   It's embedded into the top curve of the arm, and you can see the dimple just sticking out on the first picture.   Even though its an LED, it still makes heat and must be attached to a heat-sink...   so I used thermal epoxy to affix it to one of the aluminum lanminates, which should provide enough heat sinking.   
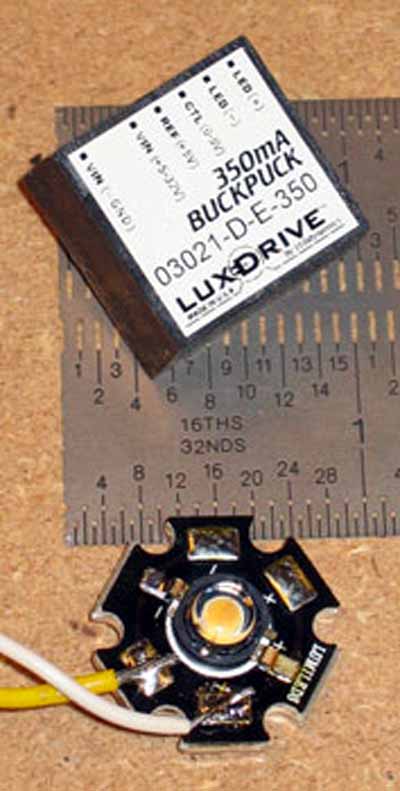
I didn't have it attached in the photographs, but the power cord attaches to the end of the arm and goes to a small box that has the microcontroller that powers the LED.

There's a cord that plugs into the bottom of the arm, that runs to a box with the microcontroller.   That box gets its power from a transformer that plugs into the electrical outlet.

The microcontroller makes sure that whatever the input voltage (anywhere between 9 and 35 volts), the output is 1000mA, which is the maximum continuous drive for a 3w Luxeon.   The box also gives the ability to dim, which, with these types of LEDs, is not done best with just a potentiometer.   It uses frequency modulation or some such thing that I don't quite understand.

As for a picture of it lit up, I've added one here.   The 3 watt LEDs are unfortunately only available in white (and other colors) but not "Warm White" which the 1 watt ones are available in.   So I am probably going to build some kind of curved shade made out of rice paper or something to yellow and soften the light. Fore more information on these LEDs, you can read papers at
    Luxeon's Web Site.


For purchasing, I recommend
    this site
or
    this one.


I've ordered from both and both were very reliable and professional.   These are not anything like the LEDs you see in consumer electronics and are VERY bright.   I have a flashlight that has a 5 watt LED in it (unfortunately a VERY expensive flashlight) that is unbelievably bright and will temporarily disorient somebody if shined in their eyes at night.   Lots of fun to encorporate these as backlights, etc, into projects.   As for how concentrated the light is, it's not.   Lumileds makes a LED that has optics affixed to the top which colimate the beam and I probably should have used that.   Honestly, I'm still somewhat reworking that part of the design.   Without it, the LEDs have something like a 130 degree spread.   With optics, it's like 20.

Other answers... what kind of glue did I use?

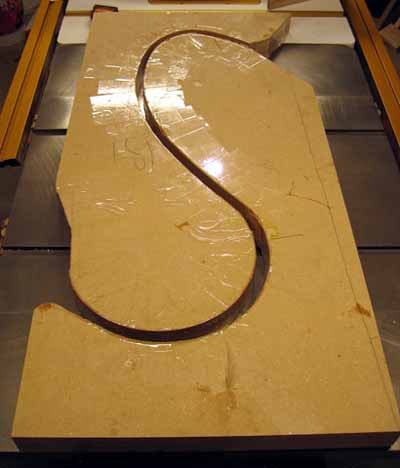
I used T-88 structural epoxy for the main arm of the lamp because epoxy sticks better to metal than wood glue (which won't stick at all).   That being said, I chemically etched the aluminum with a kit from West System designed exactly for that purpose.   It makes it so that the aluminum oxide doesn't form on the metal, which is what prevents glue from really sticking to the aluminum.   Anyway, it worked and that arm is STRONG with no gaps. If I had to do it again, I would use regular West System epoxy and not System Three T-88 because the T-88 is SO thick...   much thicker than I realized and I had a hell of a time spreading it on both sides of 12 wood laminates and 2 metal ones.

The base was glued together with URAC 185 which is a resin-based glue that I love.


Did I cut the veneers my self?

Also a long-ish answer...   The arm is made from 12 layers of walnut.   I cut the inner 10 on my bandsaw and ran them through my drum sander to almost 1/32nd of an inch.   The outer two veneers of curly walnut came like that from purchased veneer.   For the base, I bought a sheet of mahogany veneer and cut it up into small sheets, and used veneers of purchased Sapele as faces.

It's hard to take a picture with the light on because the light it casts is easily out-shined by the lights needed to take the rest of the picture, but here is the best one I took...


I have a vacuum bag but these curves were pretty severe. For both the base and the arm, I made full two-part forms from MDF, lined with cork on the inside.   Clamps might have worked, but the two-part forms seems to work better for complex shapes like this.   The form for the base was a full 8" deep so the form was a necessity as well...   there was no way I was going to get consistant pressure across 8" by using only clamps.   Anyway, if I choose to make another one of these, at least I already have the forms!

To answer a few questions I got via personal mail:

Do you have more details on the controller... like, did you make the regulator?

I used a Led Dynamics 1000ma BuckPuck, which you can find
    here.


It is sold by either of the two LED supply places I linked to in my initial email and is maybe $25.   Sounds like a lot for an epoxy-sealed cube the size of a half-dollar, but it's worth it.   You can give it a wide range of voltages and it fixes the current at 1000ma.   More info can be found at that link I gave.


Do you have a link to the actual LED product that you used?

The LED I used is a 3watt
    Luxeon Star
, which you can find
    here.


It can also be purchased at either of the two previously mentioned links and runs about $16 each.   If I had it to do over again, I'd probably use one of Luxeon's emiter/optics combinations, and I may still encorporate optics into my design to focus the beam.   A 5 watt luxeon might also have been a better choice, but they are more expensive and put out a LOT of heat.   More than I would feel comfortable dissipating in the aluminum backbone of my lamp without more testing.


The mid-section strips had to be hollow in the middle to form the cord channel... yes?

Well, that's the trick... there is no cord channel because there is no cord!   The two aluminum stripes you see on the edge of my lamp are two laminates of aluminum, which themselves, carry the current to the LED.   They never touch so there is no short (and epoxy and wood are effective insulators between the two).   That being said, this design would be really dangerous if I had used a full-voltage halogen lamp, etc, because if you touched both aluminum edges, you could be shocked.   But the LED uses so little current that it's not a big deal.   I wouldn't put my tongue on it for an hour, but since I'm not selling these in a store and it's low-current, it's fine.

You can see the parallel aluminum layers in this side view...


This is the MDF form for the main arm.   It's 2" thick and lined with cork to absorb any imperfections.


The base form took a while to make as it's just over 8" thick and MANY layers.   Lots of gluing and screwing. Also lined with cork.


I used the cutoffs from the laminations to test various things such as how to embed the LED.   This is a test drilling and routing to see how I would expose a layer of aluminum and route down to the other layer to attach the other power lead.   The blue masking tape was applied to both exposed (non-glued) faces of curly walnut before the glue-up to make sure that no glue dripped onto it and to protect the surface during shaping, etc.


This is what one of the very ends of a cut-off looked like.   You can see all the layers, dripping with epoxy.   Since the layers were all longer than the form, they splay out as they leave the form and get "frozen" like that.


This is a picture of what a Luxeon LED looks like and what a BuckPuck microcontrolled driver for one looks like.   This is actually a 1 watt Luxeon, although the 3 watt and 5 watt ones look exactly the same.   The "star" configuration, which this is, comes with the LED emiter mounted onto an aluminum base and gives you 3 solder points for each terminal.   The Buckpuck, as you can see, is VERY small as well and is mounted externally in my design.   This is a 350mA buckpuck but the one for my lamp is a 1000mA buckpuck, also the exact same size.


    By Jesse Silver - Puck


This site is maintained by:
Good-Lyddon Data Systems

Copyright © 2004-2010 Joe Lyddon, WoodWorkStuff.net