General Comments:
This project has multiple compound cuts and since
the miter and bevel cuts have to fit correctly when glued
together, it is important that each piece be nearly identical.
This means you must build sleds to help replicate
the pieces correctly.
Since you will be making compound cuts on small pieces
of wood, the sleds will make sure all the pieces are the
same size and uniform.
More importantly, make it more likely you will walk away
with all your fingers in tact at the end of the project.
Note: Just in case you are a "sled non-believer", as I
was, after all real men don't need sleds..right?
So, after wasting a lot of time, money, wood and several
near misses on the fingers,
I broke down and made two sleds
(my very first sleds)
and now I find real smart woodworkers do use sleds.
I guess some people just have to learn the
hard way... Ha
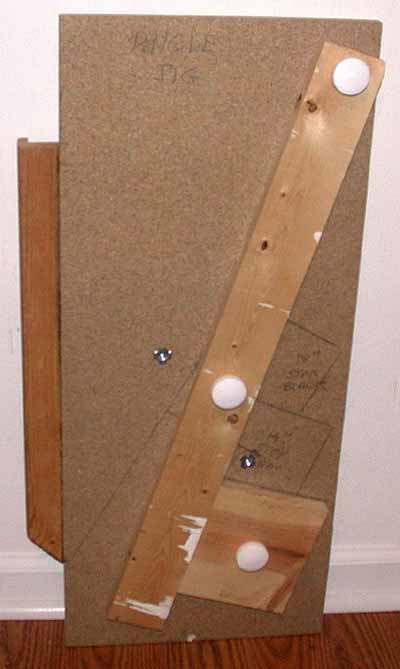
Building the Sleds:
The first sled is used for
cutting the 18 degree angle required for each
of the two pieces that make up one point of the star.
This sled is 3/4 MDF, 12" X 27", with a
1X3 pine pivot arm.
There are cleats under the sled that hold the sled to
the SMT on the Ryobi BT3K.
Note: Since completing this project,
I have added two miter tables to my BT3K so
I will probably modify the sleds to slide in the
miter slots next time.
Since I was making 18", 24" and 32" stars,
I set up this sled for those specific size blanks.
By moving the stop down and the pivot out, you are set for
the next size blank to be cut at 18 degrees.
The size of the star is determined by the width of the
lumber used.
I used 1X4, 1X6, and 1X8, No. 2 pine.
To make 18", 1X4,
24", 1X6, and
32" 1X8 stars.
The pivot arm on sled 1 has
three set positions depending on the size of star you
are making.
It is set up for an 18 degree angle for a 1X4 with a stop
block at the top position.
Then it is also set up to cut 18 degree angles for 1X6
with a stop block in the middle position.
It is also set up to cut an 18 degree angle for a 1X8
with a stop block at the bottom position.
I set up the pivot arm for each position
marking the MDF for the angle and the hole to
drill for setting T-nuts in each position to
hold the pivot arm and stop block when
changing the size of lumber you are using.
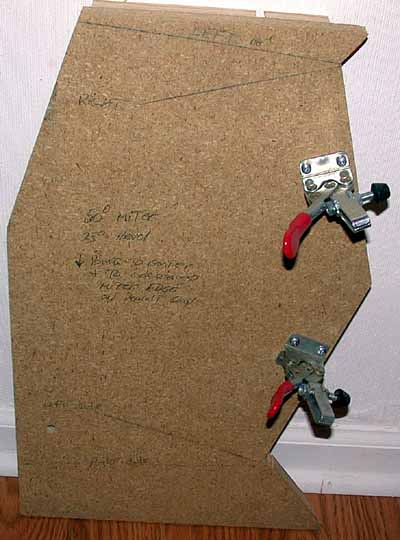
The second sled is set up for
cutting the 45 degree bevels on each side of
the star points.
Since each point of the star has a left and right piece
as you look down on the point,
the sled is set up to cut the 45 degree angles for a
left piece and for a right piece.
The center of the point meets to form a 90 degree angle
when the two 45 degree pieces are glued together and
since the bottoms are also cut at 45 degrees,
the point will be 3D but the bottom will lay
flat on the table.
Tools and Ingredients used:
Ryobi BT3K table saw
Dewalt 12" sliding compound miter saw
Craftsman 18 gauge brad nailer and one inch brads
Two sleds made especially for this project
1X4, 1X6, and 1X8 No. 2 pine
Yellow glue
Dry wall plaster to cover up brad holes and hide
imperfections on backside of star.
White primer and various colors of latex paint as
specified by the commander and chief (LOML).
Getting Started:
I recommend you start building small stars first
(in my case the 18") because
when you are in the early part of your learning
curve, errors occur and
it will be less costly when that happens.
Since this star has five points and
each point is made up of two pieces
you can start by cutting ten 18" blanks
(+ 2 spares)
to be used in sled #1 for cutting the 18 degree triangles.
Since errors will occur I would cut two extra blanks
to cover that contingency.
1. Cut twelve 18" blanks from
the 1X3 stock.
(10 + 2 spares)
Cutting the 18 degree angle:
2. Using sled #1, cut the 18
degree angle on all 12
blanks so you now have 12 triangles.
3. Layout 2 triangle blanks with
the straight edge back to back so you have a 36 degree point at the
top which will look like one triangle cut down the middle.
Note: notice that the two
pieces that make up one
point are mirror images of each other.
i.e. you have to turn one side upside
down to put the straight edges together.
4. Now mark the pieces
left and right.
Repeat this process till you
end up with six left and
six right pieces.
Note: I drew an arrow pointing to the straight edge
so when I put the left and right pieces together the
arrows were pointing at each other.
This will help you maintain your sanity later when
it comes time to make the compound cuts.
Cutting the 45 degree bevels:
5. Place each triangle
in sled #2 and cut 45 degree bevels on each the two long sides.
Repeat this process for all 12
triangles.
Cutting the 36 degree compound angle:
OK, this is the tricky part.
6. Set the compound miter saw up
for 54 degree miter, that will give you a 36 degree angle on
the short end where the points all come together,
and a 25 degree bevel which is sloped
back toward the 18 degree point.
7. Place the left triangle
with the arrow pointing to
the back edge of the miter and the short side facing
the cutting blade.
The saw should be in the far right position for a left
side cut.
Note: The cut has to be
such that you end up with a 36 degree point
(2 sides X 36 degrees = 72 degrees)
(5 points X 72 degrees + 360 degrees) in the middle
when you put the two sides together.
Repeat the process for all 6 of the left sides.
8. Place the right triangle with the
arrow pointing to the back edge of the miter and
the short side facing the cutting blade.
The saw should be in the far left position
now reset for 54 degrees miter and a 25
degree bevel.
Make sure the bevel is sloping back toward the opposite
18 degree point.
Repeat the process for all 6 of the
right sides.
Assembling the star:
9. First place yellow glue
on one of the sides (left of right) where the
arrow is pointing.
10. Place the left and right side of one
point together
(arrows facing each other) and
put several brads on the back side
to hold the point together.
I put some brads on the front side just to help pull the
center together better.
Repeat steps 9 & 10 till all five points
are assembled.
11. Now assemble the five
points by gluing one of the 36 degree angles and
brad nailing it to one of the other points.
Repeat this process till the star is
complete.
12. Let set over night
for the glue to set up.
Note: After the glue set, I used wall plaster
to hide any gaps in the back and to cover the brad nails.
Finishing:
13. Sand star and prime the
wood for paint.
14. Paint any desired color
as dictated by the boss LOML.
NOTE: This was done from memory and I will try to
duplicate the steps later to see how good my memory
really is so if anyone has a better way please let
me know.
I am especially interested in any suggestions on the
sleds since this was my first attempt at sled building.
NOTE: I would also like to thank
Frank H. at fhi953@centex.net
for all his help and encouragement along the way his
suggestions really helped me get this project up and running.
Bob Pepple - fcpjax
|
|
|