|
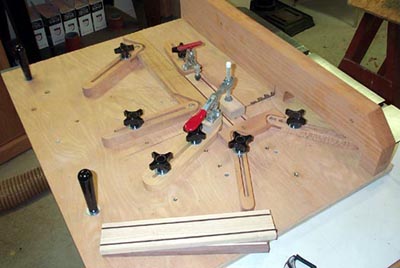
From: Ron50 Dave a while back you posted a sled to cut I think small parts. Could you posted it again and do you remember where you got the plans from. From: daveknipfer Sure Ron ... let me find the photo URL and I'll attach it to the next message here. The sled came from a book called "Laminated Designs in Wood" by Clarence Rannefeld. A while back I was playing around with 2nd and 3rd generation mitered laminates and Rannefeld's book is the definitive source for design information on the subject. Anyways .... he did not have any 'plans' per se ... just some photos of his sled in action ... which I stared at long enough to make my own version. It works great ... I can cut any small part, at any length, at any angle, using my tablesaw and still count to 10. From: daveknipfer Found 'em ... here you go Ron ... |
|
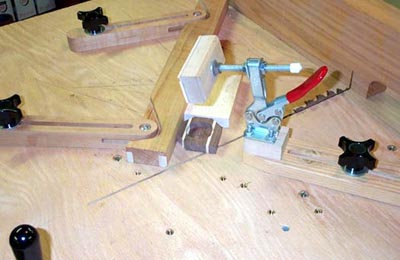
Hope that helps From: lomax Ron, The book Dave refers to is available from the Sno-Isle library system. From: Joe Lyddon Dave, I'm finally getting my TS cutoff sled into the 'making' process. I have thought of using T-slots for mounting clamps, etc. and changed my mind because I thought it would weaken the sled. Then, I remembered these pictures and finally found them again! Questions: 1. Are those steel 1/4" inserts or T-nuts mounted from the bottom? 2. Are those slotted wood pieces made from one piece or glued pieces? 3. What kind (brand/model) are those hold-down clamps? 4. I see a lot of vaccant places to attach things. . . do you just add points to cover a need as it happens or is there some other logic behind their placement? 5. Do I see a small block of wood attached to the end of a clamp (to hold small thin pieces?) 6. What are those vertical handles doing at the back-side of the sled? Surely, you don't reach over the sled to get to them. Taking this approach, one can just add additional tie points as the need arises, etc. which really makes sense to me. I can see where you'd better be careful or you could really cut the wrong the things! Thank you. From: daveknipfer Another blast from the past .... I see Joe is effective at seraching the archives! Let's see .... 1. Those are 1/4" threaded inserts. 2. The slotted arms are one-piece ..... I routed the grooves and cut the open end on my table saw. 3. They are DeStaco toggle clamps ..... you can find them in most any WW catalog in a variety of sizes and styles. 4. All the 'empty' inserts you see here were added over time as my clamping needs demanded ..... somehow it seems like every new project wants a different configuration of clamps so all those inserts just kind of grew over time. 5. The small block of wood is actually a piece of 1/4" plywood that is the sacrifical surface to keep from chewing up my clamp. I only use it on the piece that fits over the saw kerf .... and set the saw height to cut into the plywood not my clamp. When it's all chewed up ... it's much easier to replace that part then my entire clamp head. DAMHIKT. 6. The vertical handles at the back of the sled are where I stand ...... that is the end nearest me. My hands go there and stay there ..... I can still count to 10!! From: Joe Lyddon Very good Dave! I pictured you adding inserts to meet the need as it happened. . . nice way to go! I have to go searching for STEEL inserts. . . I don't think Brass ones would be strong enough do you? I noticed those handles are actually in front of the saw (if you look at the saw blade), right? That is a very SAFE way to do it! Perhaps, sending the plans to Larry would be appreciated!? I also noticed the slot in the bottom of the back fence/support. Cool idea to enable longer pieces to be cut at angles, etc.! Very nice! Is the back fence/support perfectly square to the blade? If it wasn't, I can see how you could easily arrange those adjustable fences to be referenced from the saw blade slot. As far as searching the archives go, I had a project going where I needed to get some "back" pictures, etc. and it paid off in other areas at the same time! And I finally figured out how to do it! Thank you again, Dave, for all of your help. 
 This site is maintained by: Good-Lyddon Data Systems Copyright © 2004-2005 Joe Lyddon, WoodWorkStuff.net |