|
|
Well, this is about midway between a
shop jig, a
shop technique, and a
project.
I believe your website visitors will love this one.
I built a cutting board that is not a rectangle, a square, or a circle.
Instead, it's a perfect ellipse.
See my attached diagram.
Drawing a perfect ellipse on a board takes a little skill.
The first thing you have to do is make a rectangular board from which to cut the
ellipse.
I like to edge glue up boards, butcher-block style, using about
any scraps I can find in the shop and cut them all to the same width.
My thickness planer has a capacity of 12-1/2", so I tend to stay under that
final width with my cutting boards.
In this case, I used 16 rows of boards, each row averaging a little
over 3/4" wide and 7/8" thick.
The length of the rows averaged about 18", so I planned on a final
rectangle that was 12.2"W x 17"L.
Actually, all the glued-up boards do not have to be the same full
length, but a couple of rules are required.
Several shorts can be butted up, but those on the same row have to be
the same width.
Also, the outside two or three boards should all be full length to entrap
the shorts.
I mixed and matched hickory, ash, and
cherry pieces in a somewhat random pattern, never gluing up more than
three rows at a time.
After planing the glued-up board to final thickness, it was time to
draw the ellipse.
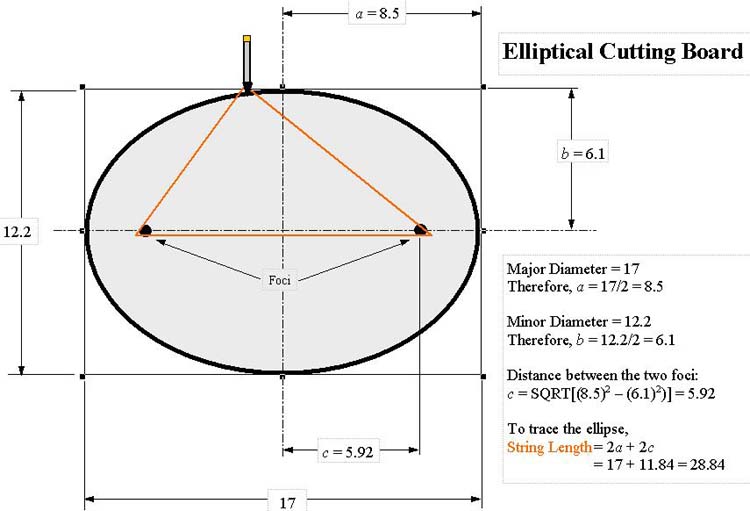
Finding the exact center is a piece of cake, but finding the two focal
points (foci), that are needed to draw the ellipse takes a little math.
The foci are each located an equal distance, c,
from the center along the length.
Step 1) Divide the length (major diameter) of the ellipse
in half.
Call this a.
Step 2) Divide the width (minor diameter) of the ellipse
in half.
Call this b.
Step 3) Apply the formula:
c = SQRT[a^2 - b^2]
In my case, c = 5.92.
Next, I tacked a 4d common nail into each of the two foci locations,
about 1/4" deep.
To draw the ellipse, a looped string is needed so that when when
you loop the string around the two nails and keep it tight, your pencil will
float around and trace out the ellipse.
The length of this looped string is 2c + 2a.
In my case, this was 28.84".
I "cheated" a little and added 1/2" to this to compensate for the
bend around the nails and the end of the pencil.
Then, I kept the string taut and drew the ellipse.
Next, I used the bandsaw to cut out the ellipse, keeping the
blade just to the outside of the trace.
I used my disk sander to clean up the "washboard" on the
outside edge, and my random orbit sander smoothed everything out.
It's nice to have a hole to hang up the board, and this time I used the
two foci for a pair of hole locations.
After removing the two nails, I drilled a pair of 11/16" holes
right through the foci.
Using a 1/4" roundover bit, I rounded the outside edges on both sides
of the ellipse and the inside edges of the two holes on both sides.
Finally, I hand sanded with a 400 grit sanding sponge
for about half an hour and then coated my cutting board with two coats of mineral oil,
applied 24 hours apart.
That completed a dandy project.
BTW, keep the string that you used to trace the ellipse.
You can use it along with the two holes to show people how the technique worked to
draw it. It's a great conversation piece.
Best, Edwin
|
|