|
|
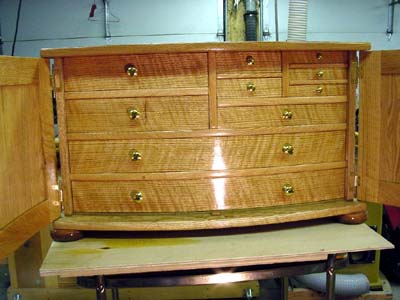
After a little longer than I figured it would take, the curved front chest
with Coopered doors is done.
This is my first attempt at something of this complexity.
I got all the figured wood for the door frames and drawer fronts out of one piece
of stripped red oak 4 1/2" x 9 1/2'.
THANK YOU! to everyone for the valuable insight I have gained lurking
on this forum over the years on tools, techniques, and finishing hints.
Thanks everyone for the comments.
The chest is a Christmas present for the wife.
If I can do the curved work, anyone can.
The drawer fronts and the rails are laminated.
I got most of the how to from doing searches on this forum.
And yes, "1wiseman", it helped the tool budget.
The wife didn't bat an eye when I told her I was going to order a Delta Unisaw and I
got the last Limited Edition Unisaw shipping from Woodworkers Supply
ordered yesterday (1-07-2004). (stealth gloat).
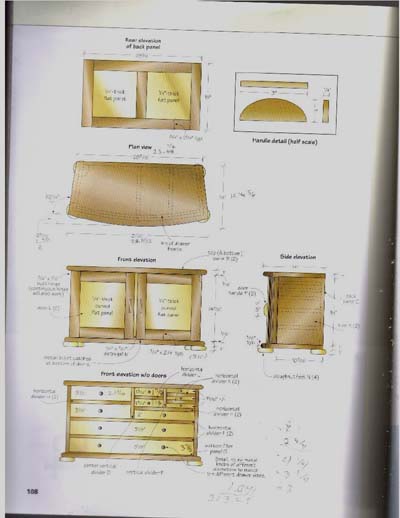
I will try to give a brief synopsis of the construction of the curved drawer
fronts and curved doors.
I started by developing a template on posterboard of the chest complete with
the curve of the doors and the matching curve of the drawers.
I used this to make the form for clamping the laminated drawer fronts to by
getting the first piece of 3/4" particle board perfectly shaped.
Then I screwed another piece of 3/4" particle board to this and
bandsawed it close and flushed it with a router.
After five layers of this I had a form high enough.
Each drawer lamination consists of five 1/8" thick by
3 1/2" wide by 32" long peices of wood.
The door rail lamination has an extra slat to make a full 3/4" thick.
The inside and outside are the figured oak and the middle layers were soft maple
mainly because that is what I had handy.
My method for cutting these thin slabs of wood is a little different.
I use a 40 tooth thin kerf 7 1/4" finishing blade in the
table saw to rip the slabs.
At full height the bade is a little over 1 3/4" high.
That means by ripping one side then flipping the board end for end and ripping the
other side I can do up to 3 7/8" thick slabs.
The kerf of the blade is 1/16" and I always rip so the slabs fall off
the outside of the blade, in this case I moved the fence 3/16" each time
to create 1/8" thick slabs.
If you joint the chunk of wood straight and square and your table saw fence is perfectly
at 90 deg. to the table top and use finger boards the few saw marks and
any small line in the middle can be taken off in seconds with a sharp scraper.
Note: I purposely did not use the Band saw because I get a cleaner cut from the Table
saw which saves a lot of time.
I use polyurethane glue and lots of clamps on the forms.
I do not like plastic resin glue but that might be because of ignorance on my part
on how to use it.
I had to make four separate glue ups for the drawers and one glue up for all the rails,
the stiles are solid wood and they are joined to the rails with loose mortise and tennon
joinerey.
The curved 1/4" panels for the doors were not too hard.
I started with 5/16" thick by 1 1/8" wide slats.
With a little trial and error found the right bevel to cut on the edges so when the slats
were clamped they matched the curve of the rails.
It was only maybe 1 1/2 deg off 90 deg.
Line-up all your slats on the workbench and use masking tape to hold them together
so you can fold them over and apply the glue to the joints.
When ready, glue it up!
You have to use a light touch with the clamps and use a weight on top of the panel while
the glue dries.
Be sure to remove the clamps and take the tape off before the glue turns
rock hard.
I hope this answers some questions and was not too long.
Believe it or not, the original plans were for a Tool Chest in a book titled:
"Building the perfect tool chest"
by Jim Stack
KyleD
|
|