|
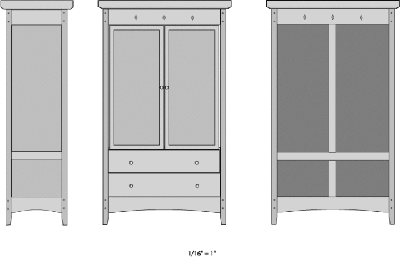
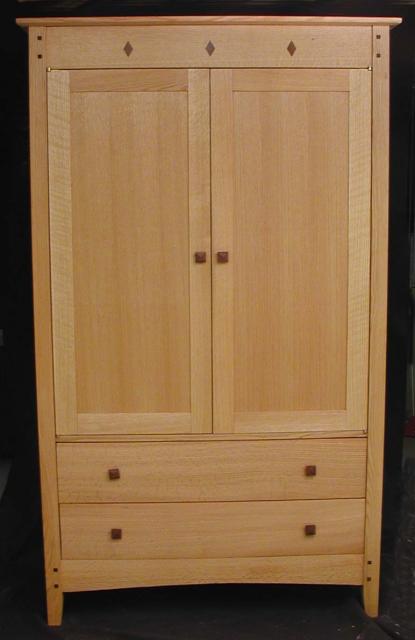
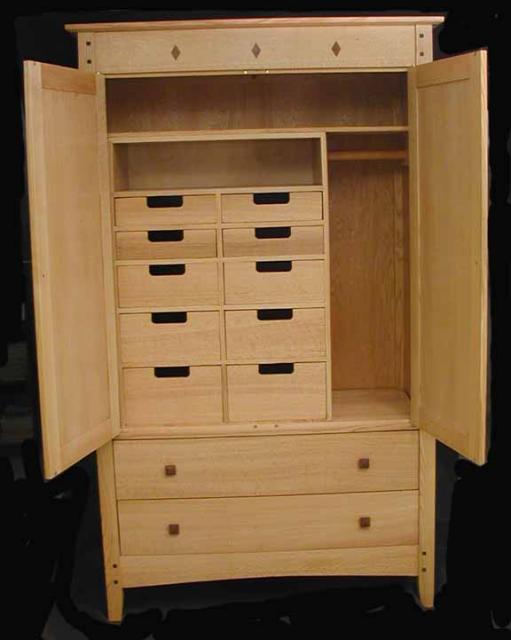
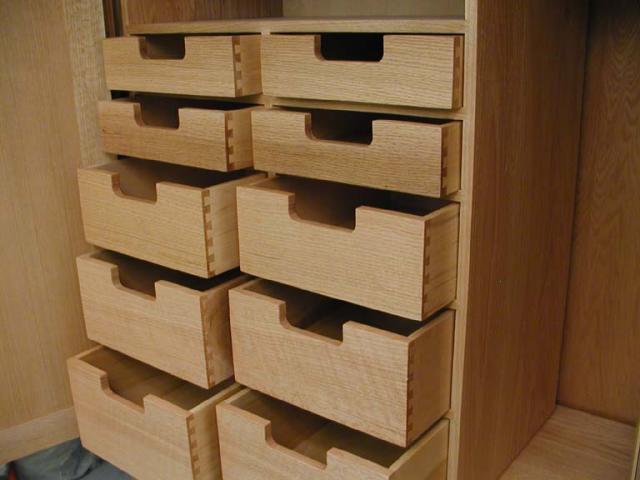
Mike Reese, 02-15-2004 06:37 PM About a year ago, I posted some info on an Armoire project I was starting. I finally finished it and delivered it yesterday. One of my daughter's mother in law had been looking for an armoire, but couldn't find what she wanted. She asked if I would consider building one for her. I, of course said, why not. After some discussion, I came up with three designs and we settled on one with 2 large drawers on the bottom and a 10 drawer unit inside with a little hanging space. |
|
Because of the size, 48"W x 84"H x 24"D,
there was a concern of being able to get up the stairs and around corners.
I remembered an article in FW about a post & beam constructed armoire and based my
design on that concept.
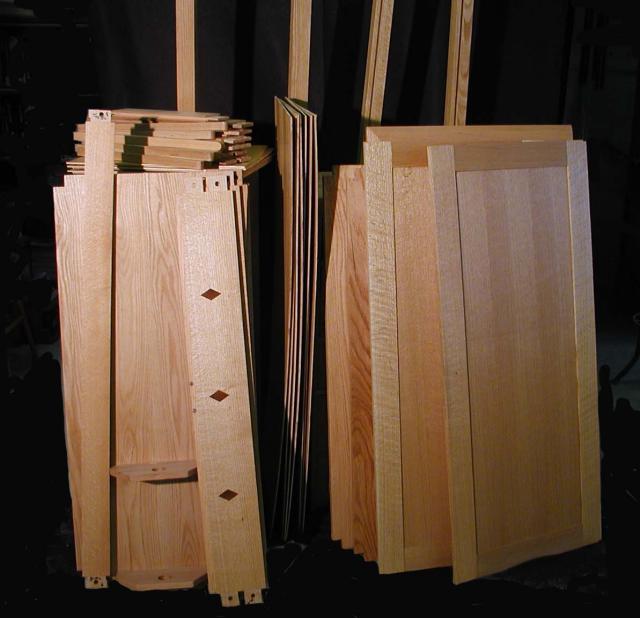
The armoire can be totally or partially disassembled to be moved. The doors, sides, & back are all made up of riff-sawn plywood. Since I couldn't find plywood that was good both sides, I ended up with 1/8" & 1/4" back to back. Frame, interior drawer unit, drawer fronts, & shelves are all solid Red Oak. Drawer sides are soft maple. All lumber purchased rough from local mill. Knife hinges are Brusso. Inlay diamonds, pegs and drawer pulls are rosewood. As with many projects, changes are required. The main one was trying to put the drawer unit into the armoire. It was originally slightly taller that the door opening. I thought we could tilt it and slip it in so that the top edge would be hidden by the top rail. It proved too heavy and awkward. I ended up removing the top and cutting it down and adding a shelf to sit on top. As it turned out, that was actually a better design. There are a couple of things I wish I had done. I should have waited and picked up some more wood in two cases. It really shows up in the photos. The top rail on the left door is darker than all the others and the second row of interior drawer fronts the same thing. I tried to make do with what I had. This was a challenging project and I learned a lot. It was definitely fun & worthwhile. Ready for delivery... |
|
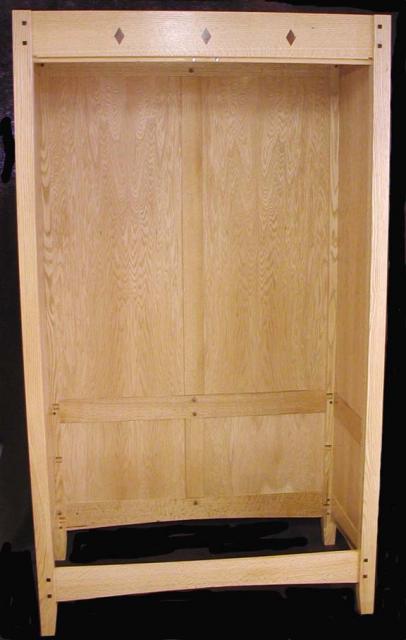
Shell without dust panels, shelves, doors & top. |
|
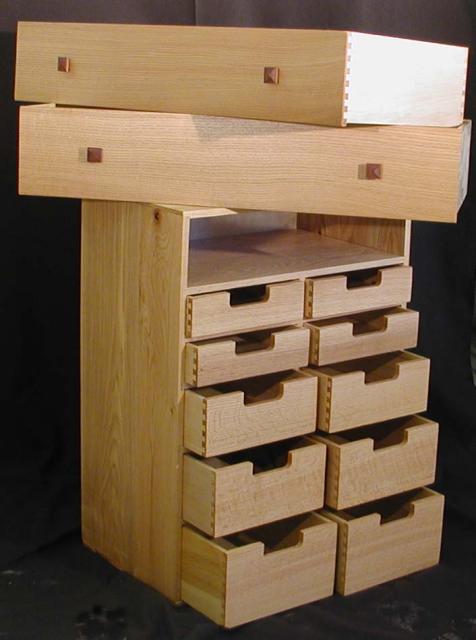
Drawer unit and all the drawers. |
|
Front - Completed Unit. |
|
Interior |
|
Close up - Drawer Unit. |
|
Forum Comments: Mike Reese, 02-16-2004 12:21 AM Thanks for the kind comments everyone. Dominic - It was designed as a knock down. Because it's such a big piece, it was the only thing that made sense. Vicki - It's my design, but based on a concept I saw in FW. All Red Oak. If you didn't see the first post titled Armoire Project, the whole thing is explained. I had a problem with posting it with all the pics, so I broke it into 2 posts. Mike Don C, 02-17-2004 09:32 AM BEAUTIFULL!!!!! Your daughters MIL will cherish that piece of work forever. Got a question? How did you do the drawings in the original post? Especially the color? Don Mike Reese, 02-17-2004 10:07 AM Don, I use Adobe Illustrator. All the fill is in Grayscale, but could easily be color. I'm a dyed in the wool Mac man and it's very easy to do. Mike Joe Lyddon, 02-17-2004 11:44 AM Mike, What a S U P E R job you did!! When you say "knockdown", does that mean you can take it apart and ship it somewhere else just like you did the first time? Like on the Shell picture, it appears that you have wooden dowels holding everything together... but, aren't they glued? If not, how did you do it? It would be interesting (to me) to know exactly how you made all of the 'knockdown' features... The drawers... do they knockdown? The drawer unit? Just awesome! That took a long time getting everything absolutely 'right on' ... How many boo boo's did you have to deal with while building it? Beautiful work! Thank you for sharing! Have fun! Joe Mike Reese, 02-17-2004 05:16 PM Joe, The knockdown design is really quite simple. All the joints are mortise & tenon. The Holes for the pegs are drilled in the posts first, then the joint is put together and the center of the hole is marked on the tenon by inserting a pointed peg with a little ink on the tip. The peg is just loose enough to easily slide in without slop. The joint is then taken apart and a hole drilled about 1/32 closer to the shoulder of the tenon. When the joint is assembled and the peg is tapped home, it draws the joint together so you have a nice tight joint. The pins should be a harder material than the material with the hole, so I used rosewood. The knobs & the inlay are also rosewood. The Holes are squared up on the outside so you get a nice finished look. To disassemble, all you have to do is use a short dowel and tap the pin out from the inside. Because of the slight offset of the tenon hole, the pins are quite snug and the whole assembly is quite rigid. The drawers and the drawer unit remain together. Because of it's size and original location, it would have been a challenge to get it in place in one piece because of some tight turns. In reality, the shell is reasonably light. The weight is in the interior components... Red Oak is not exactly light. I had to really think thru each step and I took my time. The only miscue was the drawer unit. It turned out to be too awkward & too heavty to maneuver into the unit. I cut down the height by eliminating the top shelf. Now it goes in easily. I added a full width shelf to sit on top of the drawer unit, which actually worked out better. I also ended up writting up a complete set of instructions for disassembling and reassembling the unit and all components are labeled. Mike Joe Lyddon, 02-17-2004 07:28 PM Very good Mike! Would it be OK with you if I grabbed your project post(s) & pictures and put it on my web page? Yes, I can see how that drawer unit would've been hard to get in... cutting the top off and inserting the shelf was a very good "Save"! Thank you very much! Joe Mike Reese, 02-17-2004 11:27 PM Joe, Be my guest. Mike 
 This site is maintained by: Good-Lyddon Data Systems Copyright © 2004-2010 Joe Lyddon, WoodWorkStuff.net |