Installing 5mm Hinges
Part 2

By David Knipfer
November 2, 2003


This Part is Continued from
"Building Little Boxes with David Knipfer - Part 1"
To begin, you will need a drill press fitted with a   5mm   brad point bit and a fence of some sort.

I clamp down whatever straight and flat stock I happen to have laying around for the fence.

You need to start with your box tops and bottoms the same EXACT length.   Even if you wish to make one shorter later...  start with them the same to simplify the drilling procedure.

Lay out the hinge hole location on the back edge of one of the box bottoms.   I usually place these   1"   to   1-1/2"   in from the end and centered in the back wall material.   You only need to locate one hole...   at the left end of one of the bottoms.

Adjust your fence to drill the   5mm   hole at this location and then fix a stop block to the right hand edge of the part.   Clamp that fence down tight .....   you will not need to move it again for this procedure.

Sneak up on the depth of the first   5mm   hole and lock your quill depth stop down when you get the first one just right.   The proper depth is when the hinge rotation pin centerline is just flush with the box edge.

For the   5mm   by   15mm   hinges I use,   this turns out to be a hole   0.310"   deep.

After you get here...   go ahead and drill all the holes in the left end of all the bottoms...   you can crank them out now...   just be sure to keep the parts tight against the fence and stop block and to keep any drill waste from gettings against the fences.

It should look like this at this point...
Once all the bottoms are drilled ...   one hole only.....   you now need to make a spacer shim that is built to some specific dimensions of your project.

This spacer shim is the key to getting perfect alignment...   take your time and build it accurately and you will forever be the master of these hinges!

The shim is made to the same EXACT length as your tops/bottoms,   any width wider than the parts...   and it's thickness is the difference in thickness between your box top and box bottom.

For the little boxes I'm showing here...   they are   8.80"   long,   3.50"   wide with   1.16"   thick bottoms and   0.490"   thick tops.

Sooooo...   my spacer shim is   8.80"   long by   3.7"   wide by   0.670"   thick.

I hope that is clear...   the spacer shim is the key!!

Once it's made...   you can now drill the initial holes in all the box tops by placing the spacer shim on the drill press table and setting the tops on it.

No need to adjust the depth of drill ....   since the shim thickness is the difference between your tops and bottoms it provides an automatic depth setting for you.

Go ahead and drill all the tops...   one hole only...   with the spacer shim in place and being careful to hold every thing tight against the fence and stop.

It should look like this .....
When you get to here...   you will have   5mm   holes in the left end of all the bottoms...   and   5mm   holes in the right end of all the tops.

Now you need to drill the EXACT corresponding holes on the other sides...

OK...   here is the   "Guaranteed never to Fail"   method to getting perfect alignment of those   5mm   holes...   the spacer shim.

With your spacer shim in place against the fence and stop...   release the quill depth lock and set the depth to drill all the way through the shim.   Drill that hole ...

You'll note the blue tape on the end of my spacer shim...   I cut it   0.005"   shorter than my box parts...   which is the two layers of blue tape you see here. Yes...   it wants to be that accurate!

Now...   rotate the spacer shim so that it faces the other way...   that is, with the majority of the material sticking out to the left instead of to the right.

With the drill motor off...   lower the bit through the hole you just made and fix your end stop to the left end of the spacer shim.

If you did this correctly...   you have just transfered the EXACT hole location to the other side of your parts ....   how about that!

With the new location establiished via the spacer shim...   now you can drill the opposite holes in your top and bottoms.

I start with the bottoms...   same procedure as before...   hold everything tight against the fence and stop ...   etc.

Do not forget to sneak up on the depth of that first hole again...   or else you'll drill clear through the part...   DAMHIKT.

It should look like this...

Drill all the bottoms...   use your spacer shim for height adjustment and drill all the tops.

Now you should have perfectly aligned   5mm   holes in your boxes.

A little troubleshooting is in order at this point....

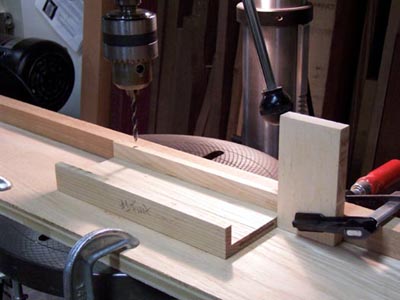
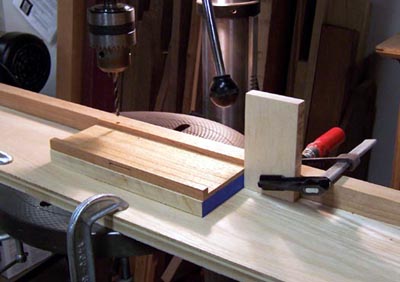
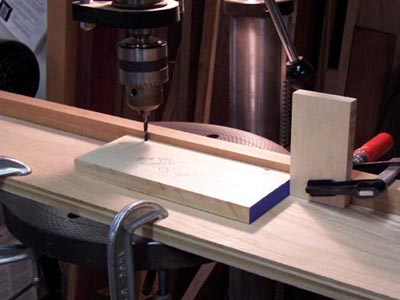
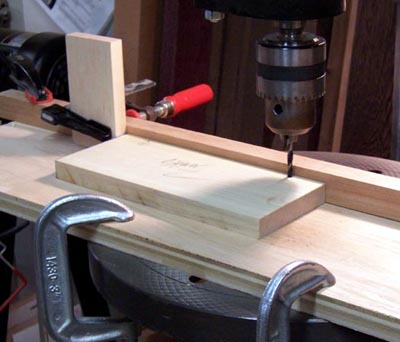
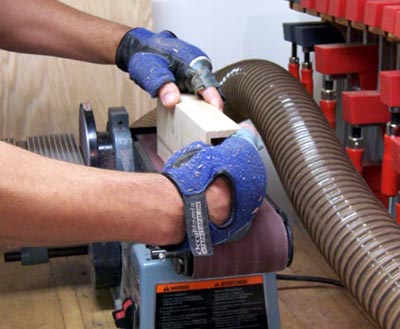
Notes:
11-3-2003
Russell T:     On the step where you reset the drill depth,   instead of sneaking up on it a second time, could you use the existing hole to reset the depth?

Dave:   I suppose you could....   if you can figure out a way to get one of the existing holes under the drill bit with the new stop position established at the left hand edge.

        I've thought about that but could not find a way to do it.......   once you swing the spacer shim around and locate the new stop......   then all the holes you already drilled don't line up any more with the drill bit.

        If you figure out how to do this.....   without having to move the carefully placed end stop ..... let me know.

Russell T:   Would this work?
        After drilling the through hole and before moving the stop - Take the box bottom, place it back in position and reset the drill depth.

Dave:   Uhhhhhhmmmmmmm ... Sure!!
        I'll do that next time Russell.....   sounds perfectly good to me.
        Thanks for the improvement.

Once I have the holes drilled ...   I dry fit the lids/bottoms by placing the hinges in the holes and pressing the box closed.

I do this to check for any mis-alignment that may have occured.   Wood is an imperfect material and I am an imperfect maker .....   so occasionally I find one that is tweaked just a little.

Now is the time to correct those if you choose to. With the hinges fitted in place to fix the top and bottom relative to each other .....   a quick pass on the belt sander corrects any misalignment that may have occured.

Note that if you are going to do this ...   and you are making a batch of similar looking boxes .....   sanding them forces that particular top to mate with that particular bottom ....   so it is a very wise move to label the tops/bottoms now so that they can be assembled later as you sanded them.

You would be amazed at how many possible permutations there are between   15   box tops and bottoms .....   DAMHIKT either.

Now you need to provide the clearance for the lids to open.....
Once you have everything squared away to this point...   you need to provide a clearance for the box lids to open.

This clearance is a   45   degree chamfer milled in the back edges....   tops and bottoms ....   that allows room for the lids to swing open.

I mill the clearance with my router table although I suppose you could cut a bevel on your table saw if you choose.

If you sneak up on the width of this chamfer...   you'll also get a built-in   95   degree stop for your lids.

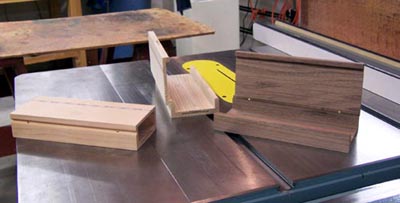
These   5mm   barrell hinges are an unobtrusive,   simple and inexpensive way to fix a small box lid and body.

I hope you give some a try in your creations.
On to Part 3 of the Series.

Enjoy

Knipfer


Forum Notes:

Topic:   davek,   quick 5mm hinge question for you

ned86xj,   03-07-2004   01:41 AM
I'm going to be making a few boxes in the coming weeks,   and I'm planning on using the 5mm Barrel hinges as you have.   You show a chamfer cut on the back where the top and the back of the box come together.

I've got my hinges on order currently,   so I can't experiment on my own just yet.   I was wondering if a   1/4   or   3/8   round-over would work as well as the chamfer?   The only reason I'm thinking of doing this is to change the design ever so slightly,   so it is an 'homage' to your design,   with some unique aspects just the same.

John and I have a bunch of shows coming up and I'd love to have some boxes to show to the buying public.   TIA for your thoughts on the matter.

Ned


daveknipfer,   03-07-2004   08:02 AM
Yes and No.

Yes .....   if you size the rounover to allow sufficient clearance then the lids will open.

But ......   those hinges swivel a full   180 degrees ....   so with a roundover your lids will swing open and then fall backwards ...

The chamfer allows for a 'built-in' stop when the two chamfer surfaces meet.

If that part bothers you .....   then find some other feature to customize.

Knipfer


ned86xj,   03-08-2004   12:02 AM
Dave,
I posted that last night just before bed,   and hadn't thought out the built in   stop aspect of the box.   I visited my spirit stash tonight and picked out some walnut,   cherry and maple which will be going into the boxes.   I may even trim up some of my prized spalted maple as well.   Thanks for your help.

Ned


Links:
Examples of the Actual hinges


This site is maintained by:
Good-Lyddon Data Systems

Copyright © 2004-2010 Joe Lyddon, WoodWorkStuff.net