Building Little Boxes
with David Knipfer
Part 4


This Part is Continued from
"Building Little Boxes with David Knipfer - Part 3"

I realize that for many of you experienced folks this mini-series on those simple boxes is child's play...   and probably boring as well.

But...   I recall the early days when I was searching everwhere for practical advise on how to do the simple things...   and how much I would have appreciated a resource like the WWA.

That said...   and in the spirit of sharing...   here is the step-by-step I use to install the commercial inlay in those box lids.

Recall that one of the rough-in steps was to route a   1/4"   wide groove down the box lid.   I make the groove somewhere around   0.040"   deep...   the commercial inlays you buy are around   0.045"   thick or so.

I also locate the groove near the front edge of the box...   it seems to my eye to give a strong visual message of where to open the box.

One of the keys to making a visually balanced inlay is to take the time to be sure the inlay pattern is centered on your box lid ..

All the commercial inlay I have come across has some sort of repeating pattern...   to my eye it just look better to locate the inlay so that the ends terminate at the same point in the pattern.

Flip the box over and cut the inlay a little long at both ends.   I use an Exacto knife and a wide blade for this.

It's tempting to try and cut the inlay to the box lid length...   resist that temptation.

You will find yourself going crazy trying to get the ends to match up once the inlay hits the glue...   I leave the ends maybe   1/16"   long for now.

Now...   here is a terrible truth about those commercial inlays...   it will be a rare day when you find some that is the exact proper width and also flat.

Almost always...   the inlay is too wide for the groove and also cupped   (bowed)   across it's width.

Both of these problems can be dealt with...   if you know to look for them BEFORE you apply the glue.

I fix the width problem by gently sanding the inlay edges with   220 grit   paper until it comes to proper width.   Sand both edges evenly since most inlays have a thin border wood that you don't want to sand thru on one side only.

By all means check to be sure that your sanded inlay fits snugly in the groove BEFORE you apply the glue.

The bowed problem can't be removed...   but is dealt with by how you place the inlay in the glued-up groove.

Always install your inlay so that the bow is facing UP...   that is...   the very edges of the inlay are touching the groove bottom first.

This allows you to   'squash'   the center down while keeping the inlay edges contained inside the groove.

As soon as that inlay hits the glue it is going to start to swell up...   and if you placed it in with the bow DOWN...   then the edges of the inlay are not going to fit tight into the groove no matter how hard you try to force them in there.

Once all that is settled...   squeeze some glue in the bottom of the groove and spread it out with your finger...   I use regular aliphatic WW glue.

Apply some firm pressure to the glued-up inlay...   you want it flat against the groove bottom.

Then...   I lay a piece of tape across the inlay and slap a clamping caul over that...   then a few spring clamps to hold it all tight for   30 minutes.

After   30 minutes   or so I unclamp the inlay and set the part aside...   now is not the time to be the eager beaver and rush to make it smooth.

The inlay is very thin and will have swelled in contact with the glue mositure...   you want all that moisture to go away before you smooth and level the inlay.

Otherwise you will end up with an inlay that is below the surface of the lid...   DAMHIKT.

I set the parts aside for   48 hours   or so before I level the inlay with a card scraper.

Thats it...   now its on to the box ends.

Enjoy

Knipfer

Dave tanks you agoin for this...

Quick question,   but please forgive my ignorance

If I was to cut my own inlay would it matter which side of the board I used?   for example should I try to resaw and use the top or could I use the long edge?   I wouldnt think it matters but I have never done this and want to make sure.
Bill


Excellent exercise Dave!

I have done inlay in a humidor I made for a friend and can only offer the following:

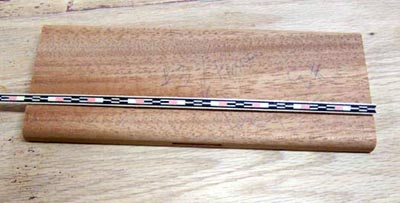
...All the commercial inlay I have come across has some sort of repeating pattern...   to my eye it just look better to locate the inlay so that the ends terminate at the same point in the pattern...   Knowing that I'm going to be using inlay I usually try to size the piece I'm building to fit near the repeated pattern.   First box I made was too far away from the pattern and I had to find another inlay   (and re-route, etc).

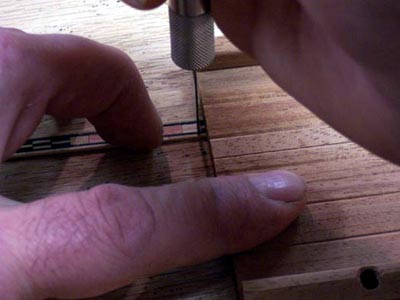
...Sand both edges evenly since most inlays have a thin border wood that you don't want to sand thru on one side only...   Yeah, its always better to sand thru both sides DAMHIKT

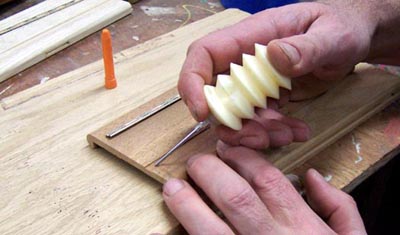
This is the greatest tip in the exercise and bears repeating:
...   As soon as that inlay hits the glue it is going to start to swell up...   and if you placed it in with the bow DOWN...   then the edges of the inlay are not going to fit tight into the groove no matter how hard you try to force them in there.   BTDT :)

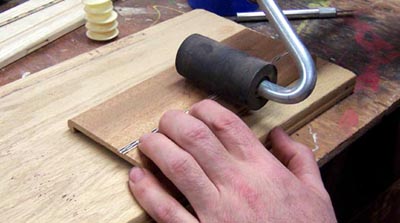
As shown in the progess pics a   J-Roller   is an excellent tool for applying even pressure.

Thanks again Dave!
Dan.


Dave,

Because of people like you I decided to join WWA.   This is not boring at all,   anytime we can learn something or refresh what we've alreadey learned,   I think is a great opportunity.   I did inlays way back in high school and none since,   so for me,   this lesson is well worth it.   Keep'em coming!

Thanks and take care,
Carlos


On to the next Part of the Series.


This site is maintained by:
Good-Lyddon Data Systems

Copyright © 2004-2005 Joe Lyddon, WoodWorkStuff.net